Imagine a world where the perfect balance of sweet, nutty, and maple-infused flavors come together in a delectable candy that melts in your mouth. Welcome to the realm of maple nut goodies, a confectionary delight that will have you reaching for just one more piece – and then another, and another!
In this comprehensive recipe guide, we’ll take you on a journey to creating these irresistible maple-infused treats in the comfort of your own kitchen. From the first bite to the last, you’ll be captivated by the rich, buttery texture and the intoxicating aroma of maple that permeates every morsel. Get ready to impress your friends, family, and even the most discerning sweet tooth with this ultimate easy maple nut goodies candy recipe.
So, let’s dive in and unlock the secrets to crafting the perfect maple nut goodies that will have everyone begging for more!
🥰 Why You’ll Fall in Love with This Recipe ?
Maple nut goodies are a true delight for the senses, and this recipe is sure to become a new favorite. The combination of toasted nuts, rich maple flavor, and a buttery, chewy texture is simply unbeatable. What sets this recipe apart is the attention to detail and the careful balance of ingredients that create a harmonious flavor profile.
One of the standout features of this maple nut goodies recipe is the use of high-quality maple syrup, which provides a depth of flavor that elevates the entire dish. The nuts, carefully selected and toasted to perfection, add a delightful crunch that complements the soft, chewy candy base. And the overall ease of preparation means you can whip up a batch of these irresistible treats with minimal effort, making them the perfect homemade gift or indulgent treat for any occasion.
Ingredients
• 2 cups packed light brown sugar
• 1 cup pure maple syrup
• 1 teaspoon baking soda
• 1/4 teaspoon salt
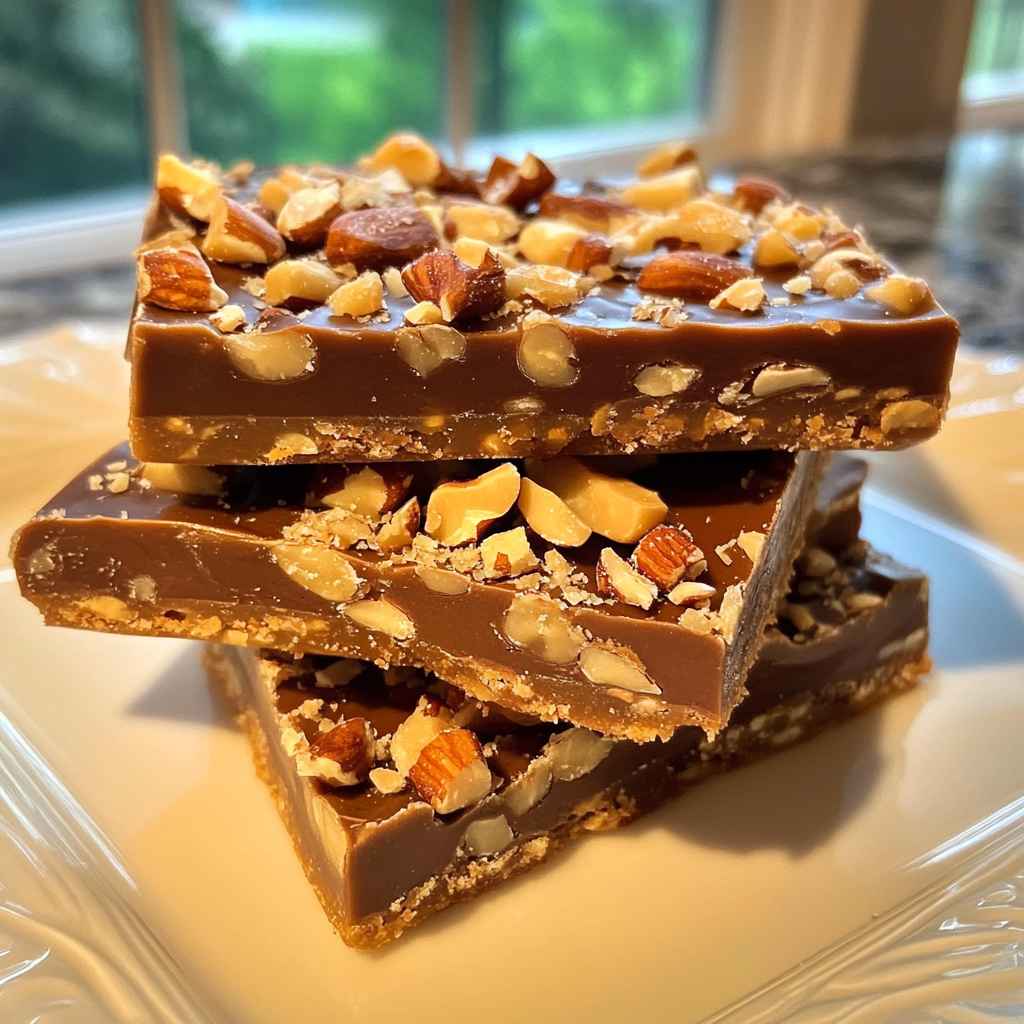
• 2 cups mixed chopped nuts (such as pecans, walnuts, and/or almonds)
The key ingredients in this recipe are the pure maple syrup and the assortment of chopped nuts. The maple syrup provides the signature flavor that sets these candies apart, while the nuts add a delightful crunch and nutty taste. You can use a mix of your favorite nuts, or focus on a single type like pecans or walnuts, depending on your preference.
Instructions
- Prepare the Pan: Line a 9×13-inch baking pan with parchment paper or a silicone baking mat, leaving some overhang on the sides to make it easier to remove the candy later.
- Toast the Nuts: Preheat your oven to 350°F (175°C). Spread the chopped nuts on a baking sheet and toast them in the preheated oven for 5-7 minutes, stirring occasionally, until fragrant and lightly golden. This step enhances the nutty flavor and adds a delightful crunch to the final candy.
- Cook the Candy Base: In a large saucepan, combine the softened butter, brown sugar, and maple syrup. Bring the mixture to a boil over medium heat, stirring constantly. Once it reaches a boil, continue cooking for 5 minutes, still stirring constantly, to allow the sugars to fully dissolve and the mixture to thicken.
- Add the Baking Soda: Remove the saucepan from the heat and quickly stir in the baking soda. The mixture will foam and expand, so be careful. This chemical reaction is crucial, as it creates the signature chewy, aerated texture of the maple nut goodies.
- Fold in the Nuts: Immediately pour the foamy candy mixture into the prepared baking pan. Sprinkle the toasted nuts evenly over the top and gently fold them in with a spatula, ensuring they are fully incorporated.
- Let It Set: Allow the maple nut goodies to cool and set at room temperature for at least 2 hours, or until firm. Once set, use the parchment paper overhangs to lift the candy out of the pan and onto a cutting board.
- Cut and Serve: Using a sharp knife, cut the maple nut goodies into desired shapes and sizes. Enjoy your homemade treats immediately or store them in an airtight container for up to 2 weeks.
Timing Overview
• Cook time: 10 minutes
• Chill time: 120 minutes
• Baking time: 5-7 minutes
• Total Time: 150 minutes
Nutritional Information
Nutritional information is an estimate per serving, based on 24 servings.
• Protein: 2 g
• Sodium: 140 mg
• Carbohydrates: 26 g
• Fat: 12 g
• Fiber: 1 g
💡 How to Customize This Recipe ?
• To Make it Vegan: To create a vegan version of this recipe, substitute the butter with an equal amount of vegan butter or coconut oil, and use a plant-based milk (such as almond or oat milk) in place of the maple syrup.
• To Add a Spicy Kick: For a touch of heat, try adding a pinch of cayenne pepper or a few drops of hot sauce to the candy mixture before pouring it into the pan. The spicy element will provide a delightful contrast to the sweet maple and nutty flavors.
🥂 Perfect Pairings & Serving Suggestions
• Garnish Suggestions: Elevate the presentation by drizzling the maple nut goodies with melted dark chocolate or sprinkling them with a dusting of powdered sugar or chopped toasted pecans.
• Beverage Pairing: These candies pair beautifully with a warm cup of coffee, a glass of cold milk, or a cozy mug of hot apple cider for a delightful contrast of flavors.
❗ Pro Tips for a Perfect Outcome Every Time
• Mistake 2 – Overcooking the Candy Base: Cooking the sugar mixture for too long can cause it to become overly hard and brittle. Be vigilant about the timing and stop cooking as soon as the 5-minute mark is reached.
• Mistake 3 – Letting the Candy Cool Unevenly: If the maple nut goodies are not allowed to cool completely before cutting, the texture will be uneven, with some parts being too soft and others too hard. Patience is key when waiting for the candy to set.
📦 How to Keep Your Leftovers Fresh ?
• Freezing: These candies can be frozen for up to 3 months. Wrap them tightly in plastic wrap or place them in a resealable freezer bag, ensuring as much air is removed as possible.
• Reheating: To enjoy the maple nut goodies at their best, simply allow them to thaw at room temperature before serving. You can also gently warm them in the oven at 300°F (150°C) for 5-7 minutes to restore their soft, chewy texture.
❓ FAQs
Can I use a different type of nut in this recipe?
Absolutely! The beauty of this maple nut goodies recipe is that you can swap in your favorite nuts or use a combination of different varieties. Pecans, walnuts, almonds, and cashews all work wonderfully. Just be sure to toast them before incorporating them into the candy mixture for maximum flavor.
How can I prevent the candy from becoming too hard?
The key to preventing the maple nut goodies from becoming too hard is to not overcook the sugar mixture. Be diligent about the 5-minute cooking time and remove the pan from the heat as soon as the timer goes off. Additionally, be sure to let the candy cool completely before cutting into it, as this will help maintain the perfect chewy texture.
Can I make these maple nut goodies ahead of time?
Yes, these candies are perfect for making in advance. Once the maple nut goodies have cooled and set, you can store them in an airtight container at room temperature for up to 2 weeks. For even longer storage, you can freeze them for up to 3 months. Just be sure to thaw them at room temperature before serving.
Do I need to use pure maple syrup, or can I substitute with pancake syrup?
For the best flavor and authentic maple experience, it’s essential to use pure maple syrup in this recipe. Pancake syrups are typically made with corn syrup and lack the depth of flavor that pure maple syrup provides. Investing in a high-quality maple syrup will truly make a difference in the final product.
How can I make these maple nut goodies vegan?
To create a vegan version of this recipe, you’ll need to substitute the butter with a plant-based alternative, such as vegan butter or coconut oil. Additionally, you can replace the maple syrup with a vegan-friendly sweetener like agave nectar or maple-flavored syrup made from dates or other fruit. Just be sure to adjust the quantities as needed to achieve the same delicious results.
🥳 Wrapping It Up
Indulging in a bite of homemade maple nut goodies is like a warm hug for the senses – the comforting aroma, the rich maple flavor, and the satisfying crunch of the toasted nuts come together in perfect harmony. This recipe is a true celebration of the joys of candy-making, and with a little bit of effort, you can bring this delightful treat into your own kitchen.
Whether you’re looking to impress your guests, create a thoughtful homemade gift, or simply treat yourself to a moment of pure indulgence, this maple nut goodies recipe is sure to become a cherished addition to your culinary repertoire. So, gather your ingredients, follow the steps, and get ready to experience the ultimate in sweet, nutty perfection. Bon appétit!

The Ultimate Easy Maple Nut Goodies Candy Recipe
⏱️ Timing Overview
🥘 Ingredients
📝 Instructions
- Line a 9x13-inch baking pan with parchment paper or a silicone baking mat, leaving some overhang on the sides to make it easier to remove the candy later.
- Preheat your oven to 350°F (175°C). Spread the chopped nuts on a baking sheet and toast them in the preheated oven for 5-7 minutes, stirring occasionally, until fragrant and lightly golden. This step enhances the nutty flavor and adds a delightful crunch to the final candy.
- In a large saucepan, combine the softened butter, brown sugar, and maple syrup. Bring the mixture to a boil over medium heat, stirring constantly. Once it reaches a boil, continue cooking for 5 minutes, still stirring constantly, to allow the sugars to fully dissolve and the mixture to thicken.
- Remove the saucepan from the heat and quickly stir in the baking soda. The mixture will foam and expand, so be careful. This chemical reaction is crucial, as it creates the signature chewy, aerated texture of the maple nut goodies.
- Immediately pour the foamy candy mixture into the prepared baking pan. Sprinkle the toasted nuts evenly over the top and gently fold them in with a spatula, ensuring they are fully incorporated.
- Allow the maple nut goodies to cool and set at room temperature for at least 2 hours, or until firm. Once set, use the parchment paper overhangs to lift the candy out of the pan and onto a cutting board.
- Using a sharp knife, cut the maple nut goodies into desired shapes and sizes. Enjoy your homemade treats immediately or store them in an airtight container for up to 2 weeks.