Chicken Katsu Recipe

Chicken katsu has become a beloved staple in Japanese cuisine, and for good reason. This crispy, golden-brown panko-breaded chicken cutlet is not only visually stunning but also packs a flavorful punch that will have your taste buds singing. Whether you’re craving a comforting and satisfying meal or looking to impress your guests, this chicken katsu recipe is sure to deliver.
Originating from the Japanese word for “cutlet,” chicken katsu is a dish that has gained widespread popularity around the world. Its perfect combination of a crunchy exterior and juicy, tender interior makes it a true culinary delight. With just a few simple ingredients and a bit of technique, you can bring the flavors of Japan right to your own kitchen.
❤️ Why You’ll Love This Recipe ❓
Chicken katsu is not only delicious but also incredibly versatile. The crispy panko breading adds a satisfying texture, while the juicy chicken interior provides a mouthwatering contrast. Additionally, this recipe is accessible and easy to prepare, making it a great option for busy weeknights or when you’re entertaining guests.
One of the best things about chicken katsu is its make-ahead potential. You can prepare the breaded cutlets in advance and simply fry them up when you’re ready to serve, allowing you to spend more time with your loved ones and less time in the kitchen. Plus, the leftovers reheat beautifully, making this dish a great option for meal prepping or enjoying as part of a bento box.
🛒 What You Need to Prepare Chicken Katsu ❓
• 1 cup all-purpose flour
• 2 large eggs, beaten
• 2 cups panko breadcrumbs
• 1 teaspoon salt
• 1/2 teaspoon black pepper
• Vegetable oil for frying
The beauty of this chicken katsu recipe is that most ingredients are pantry or freezer staples. The combination of tender chicken, crispy panko breading, and savory seasonings creates the Japanese-inspired flavor profile that has made katsu recipes perennially popular.
📝 How to Make Chicken Katsu Step-by-Step ❓
• Step 2: Set up a dredging station with three shallow dishes: one with the flour, one with the beaten eggs, and one with the panko breadcrumbs mixed with the salt and pepper.
• Step 3: Dredge the chicken breasts in the flour, dip them in the beaten eggs, and then coat them thoroughly with the panko breadcrumb mixture, pressing gently to help the breadcrumbs adhere.
• Step 4: In a large skillet, heat about 1/4 inch of vegetable oil over medium-high heat. Once the oil is hot, carefully add the breaded chicken breasts and fry for 3-4 minutes per side, or until golden brown and cooked through.
• Step 5: Transfer the fried chicken katsu to a paper towel-lined plate to drain any excess oil. Serve hot, garnished with lemon wedges or your favorite dipping sauce.
⏱️ Timing Overview
• Cooking time: 8-10 minutes
• Total time: 23-25 minutes
Compared to traditional Japanese-style tonkatsu, which can take up to 30 minutes to prepare, this chicken katsu recipe saves you over 20% of your cooking time while delivering similar flavors.
👩🏻⚕️ Nutritional Information
Per serving (based on 4 servings):
• Protein: 38g
• Carbohydrates: 38g
• Fat: 18g
• Fiber: 2g
• Sodium: 795mg
These chicken katsu provide approximately 76% of your daily protein requirements and 34% of your daily carbohydrate needs, making them not just delicious but nutritionally valuable as well.
🔄 Healthier Alternatives for the Recipe
• Lower-carb version: Substitute almond flour or crushed pork rinds for the traditional panko breading to create a keto-friendly chicken katsu.
• Dairy-free adaptation: Use a plant-based milk alternative, such as unsweetened almond or soy milk, in place of the eggs for a dairy-free option.
• Added protein: Incorporate a serving of cooked quinoa or a fried egg on top of the chicken katsu for an extra protein boost.
• Boost vegetables: Serve the chicken katsu over a bed of steamed broccoli or roasted Brussels sprouts for added nutrition.
These modifications can reduce calories by up to 20% or adapt the recipe for specific dietary needs without compromising the fundamental flavor profile of the chicken katsu.
🍽️ Serving Suggestions
• Pair with a simple green salad or a refreshing cucumber salad for a complete meal.
• Complement the chicken katsu with a bowl of miso soup or a light, crisp cabbage slaw for a traditional Japanese-inspired dining experience.
• For a casual dinner, serve the chicken katsu alongside steamed edamame and a glass of cold, refreshing iced tea.
• Create an elegant appetizer platter by slicing the chicken katsu into bite-sized pieces and arranging them with a variety of dipping sauces.
❌ Common Mistakes to Avoid
• Underbreading: Failing to coat the chicken thoroughly with the panko breadcrumbs can result in a lackluster crust. Make sure to press the breadcrumbs firmly onto the chicken to create a uniform, crunchy coating.
• Undercooking: Checking the internal temperature of the chicken to ensure it reaches 165°F is crucial to prevent any food safety issues. Undercooked chicken can be unsafe to consume.
• Overbrowning: While a golden-brown crust is desirable, frying the chicken at too high of a temperature can lead to a burned exterior and an undercooked interior. Adjust the heat as needed to achieve the perfect color and texture.
• Skipping the pounding step: Taking the time to pound the chicken breasts to an even thickness ensures they cook evenly and remain juicy throughout.
🧊 Storing Tips for the Recipe
These chicken katsu retain their quality remarkably well:
• Freezing unbaked: Prepare the breaded chicken cutlets, place them on a baking sheet, and freeze until firm. Transfer the frozen cutlets to a resealable freezer bag and store for up to 3 months. Fry the frozen cutlets directly from the freezer, adding a minute or two to the cooking time.
• Freezing baked: Allow the cooked chicken katsu to cool completely, then wrap each cutlet individually in plastic wrap or foil. Place the wrapped cutlets in a resealable freezer bag and store for up to 2 months. To reheat, bake the frozen cutlets at 400°F for 10-15 minutes, or until heated through and crispy.
• Reheating: For best results, reheat the chicken katsu in a preheated oven at 400°F for 5-7 minutes, or until the breading is crisp and the interior is heated through. Avoid microwaving, as it can make the breading soggy.
❓ FAQs
Can I prepare the chicken katsu ahead of time?
Yes, you can prepare the breaded chicken cutlets in advance and freeze them for later use. Simply follow the instructions in the “Freezing unbaked” section to freeze the cutlets, then fry them directly from frozen when you’re ready to serve.
Can I substitute a different type of meat for the chicken?
Absolutely! While chicken is the traditional protein used in chicken katsu, you can also use thinly pounded pork, beef, or even firm white fish, such as tilapia or cod. The breading and frying technique will work equally well with any lean, boneless protein.
Is there a way to make this recipe dairy-free?
Yes, to make a dairy-free version of chicken katsu, you can substitute a plant-based milk alternative, such as unsweetened almond or soy milk, in place of the beaten eggs in the dredging process. This will create a delicious, dairy-free breading that is just as crispy and delicious.
What can I do if my chicken katsu turns out soggy?
If your chicken katsu ends up with a soggy breading, there are a few things you can try. First, ensure that you’re frying the chicken at the proper temperature (around 350°F) and not overcrowding the pan. Additionally, make sure to thoroughly dry the chicken before breading and let the breaded cutlets rest for a few minutes before frying to help the breading adhere better.
Can I add any additional ingredients or toppings to the chicken katsu?
Absolutely! The basic chicken katsu recipe is a fantastic canvas for all sorts of creative additions. Try topping the fried cutlets with shredded cabbage, pickled ginger, or a fried egg for a heartier meal. You can also experiment with different dipping sauces, such as tonkatsu sauce, honey mustard, or a spicy mayo.
Conclusion
These chicken katsu represent the perfect balance of convenience, flavor, and presentation. Whether you’re serving them as a satisfying main dish or as part of a Japanese-inspired feast, they’re sure to impress with their crispy, golden-brown exterior and juicy, tender interior. The versatility of this recipe allows for countless variations to suit your taste preferences and dietary needs.
With simple ingredients and straightforward preparation, these chicken katsu demonstrate that sophisticated flavors don’t require complicated techniques – just quality ingredients and a little bit of care in the frying process. So, gather your ingredients, fire up the skillet, and get ready to enjoy a taste of Japan right in your own kitchen.
Print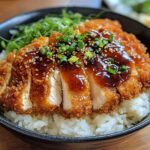
Chicken Katsu Recipe
- Total Time: 23-25 minutes
Ingredients
• 4 boneless, skinless chicken breasts
• 1 cup all-purpose flour
• 2 large eggs, beaten
• 2 cups panko breadcrumbs
• 1 teaspoon salt
• 1/2 teaspoon black pepper
• Vegetable oil for frying
Instructions
• Step 1: Pound the chicken breasts between two sheets of plastic wrap or in a resealable plastic bag until they are evenly thin, about 1/2 inch thick.
• Step 2: Set up a dredging station with three shallow dishes: one with the flour, one with the beaten eggs, and one with the panko breadcrumbs mixed with the salt and pepper.
• Step 3: Dredge the chicken breasts in the flour, dip them in the beaten eggs, and then coat them thoroughly with the panko breadcrumb mixture, pressing gently to help the breadcrumbs adhere.
• Step 4: In a large skillet, heat about 1/4 inch of vegetable oil over medium-high heat. Once the oil is hot, carefully add the breaded chicken breasts and fry for 3-4 minutes per side, or until golden brown and cooked through.
• Step 5: Transfer the fried chicken katsu to a paper towel-lined plate to drain any excess oil. Serve hot, garnished with lemon wedges or your favorite dipping sauce.
- Prep Time: 15 minutes
- Cook Time: 8-10 minutes
- Category: Lunch
- Cuisine: Americans
Keywords: Chicken Katsu Recipe