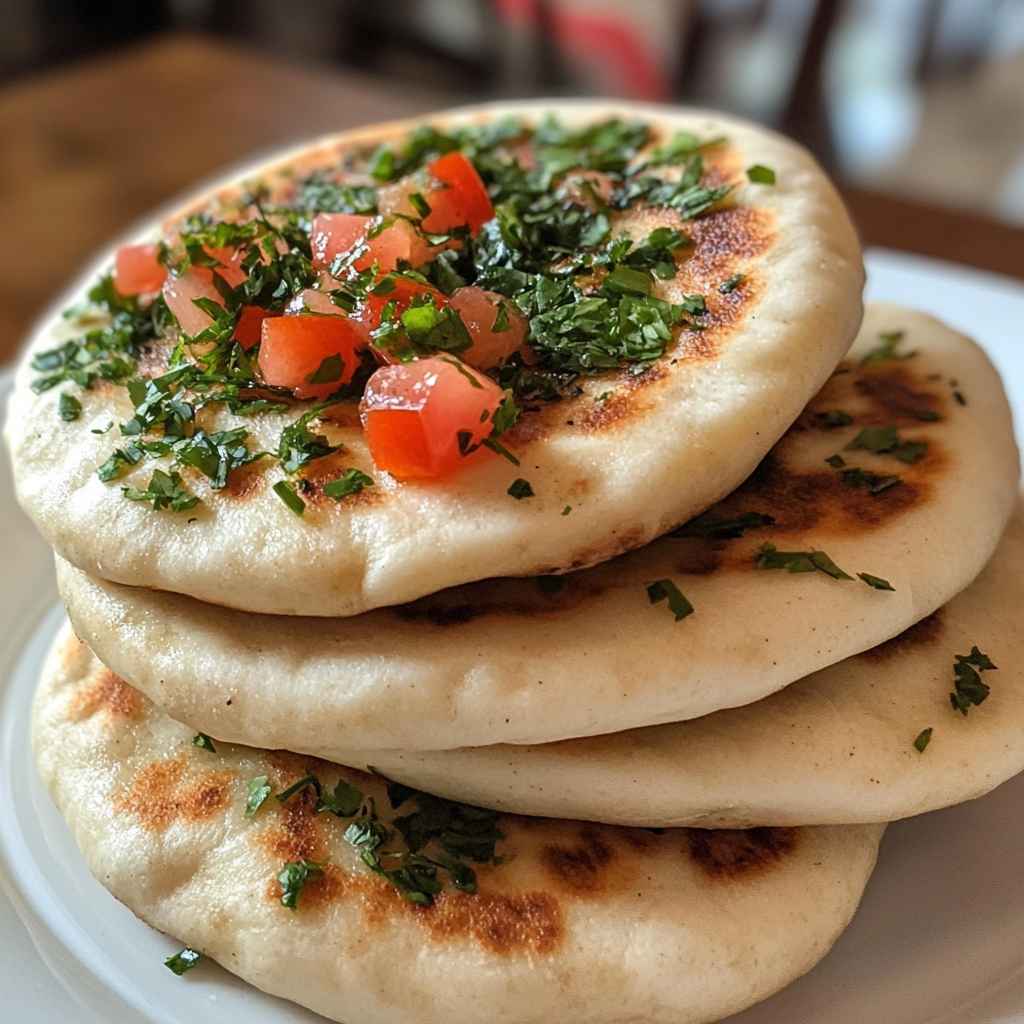
Pita bread, a beloved staple across the Mediterranean and Middle Eastern cuisines, is more than just a simple flatbread. It’s a culinary canvas that allows you to explore a world of flavors, textures, and culinary creativity. Whether you’re a seasoned baker or a novice in the kitchen, this healthy pita bread recipe will guide you through the process of creating a masterpiece that will leave your taste buds dancing with delight.
Imagine sinking your teeth into a warm, pillowy pita, the steam caressing your face as you reveal the soft, airy interior. The subtle notes of yeast and the slight crunch of the crust come together in a harmonious symphony, transporting you to a bustling marketplace or a cozy family gathering. This isn’t just a recipe – it’s an invitation to embark on a flavorful journey, where the art of bread-making meets the joy of sharing a homemade creation with your loved ones.
Prepare to be captivated by the alluring aromas and the satisfaction of crafting your own pita bread from scratch. Let’s dive in and uncover the secrets that make this recipe truly special.
💖 What Makes This Recipe Truly Special?
Pita bread is not just a simple flatbread; it’s a culinary masterpiece that showcases the perfect balance of simplicity and complexity. This recipe is a testament to the power of high-quality ingredients and meticulous attention to detail. By using a combination of whole wheat and all-purpose flour, we’ve created a pita that is not only nutritious but also bursting with flavor and texture.
The key to this recipe’s success lies in the careful proofing and shaping process. Instead of settling for a dense, heavy pita, we’ve mastered the art of coaxing out the perfect amount of rise and airiness, resulting in a bread that is light, fluffy, and oh-so-satisfying to bite into. Each pita puffs up beautifully, forming the signature pocket that is ideal for stuffing with your favorite fillings or dipping into delectable dips and sauces.
🌿 Gathering Your High-Quality Components
• 2 cups (240g) all-purpose flour, plus more for dusting
• 1 teaspoon (5g) salt
• 1 teaspoon (5g) instant yeast or active dry yeast
• 1 1/4 cups (295ml) warm water (105-115°F/40-46°C)
• 1 tablespoon (15ml) olive oil, plus more for brushing
The combination of whole wheat and all-purpose flour is key to achieving the perfect texture and flavor in this pita bread recipe. The whole wheat flour adds a nutty, earthy note and a boost of fiber, while the all-purpose flour provides the necessary structure and chewiness. The instant yeast, or active dry yeast, is responsible for the dough’s rise, creating those signature pockets in the final bread.
👩🍳 Step-by-Step Guide to Perfection
- Proof the Yeast: In a large bowl, combine the warm water and yeast. Let the mixture sit for 5-10 minutes until the yeast is foamy and activated.
- Mix the Dough: Add the whole wheat flour, all-purpose flour, salt, and olive oil to the proofed yeast mixture. Using a wooden spoon or your hands, mix the ingredients until a shaggy dough forms. Turn the dough out onto a lightly floured surface and knead for about 5-7 minutes, until the dough becomes smooth and elastic.
- First Rise: Place the dough in a lightly greased bowl, cover with a damp towel or plastic wrap, and let it rise for 1-1.5 hours, or until the dough has doubled in size.
- Punch Down and Divide: Gently punch down the dough to release any air bubbles. Divide the dough into 8 equal pieces and shape each piece into a smooth ball.
- Roll and Shape: On a lightly floured surface, use a rolling pin to roll each dough ball into a thin, round circle, about 6-8 inches in diameter. Be gentle to avoid over-working the dough.
- Cook the Pitas: Heat a large, dry skillet or griddle over medium-high heat. Working in batches, carefully transfer the rolled-out pitas to the hot pan. Cook for 1-2 minutes per side, or until the pitas are puffed up and lightly golden brown. Be careful not to overcrowd the pan.
- Brush and Serve: As soon as the pitas come off the heat, brush them lightly with olive oil. Serve the warm pitas immediately, or allow them to cool before storing.
⏱️ Timing Overview
• Cook time: 10-15 minutes
• Total time: 1.5-2 hours
💪 Understanding the Nutritional Value
Nutritional information is an estimate per serving, based on 8 servings.
• Protein: 6 g
• Carbohydrates: 35 g
• Fat: 3 g
• Fiber: 4 g
💡 How to Customize This Recipe ?
• To Make it Vegan: Omit the olive oil and use a plant-based milk or water in place of the warm water. You can also experiment with using a vegan butter or coconut oil for brushing the pitas.
• To Add a Spicy Kick: Mix in a teaspoon of paprika, cayenne pepper, or crushed red pepper flakes to the dough for a subtle heat. You can also serve the pitas with a side of your favorite spicy sauce or dip for an extra flavor boost.
🍽️ Plating and Presentation Tips
• Garnish Suggestions: Garnish the pitas with a sprinkle of chopped parsley, a drizzle of high-quality olive oil, and a sprinkle of za’atar seasoning for a stunning, restaurant-worthy presentation.
• Beverage Pairing: This pita bread pairs beautifully with a refreshing cucumber-mint lemonade, a crisp white wine, or a glass of freshly brewed mint tea.
❗ Pro Tips for a Perfect Outcome Every Time
• Mistake 2 – Using Cold Ingredients: Ensure that all your ingredients, especially the water, are at the proper temperature. Cold ingredients can inhibit the yeast’s activity and lead to a dense, heavy pita. Aim for the water to be between 105-115°F (40-46°C) for optimal proofing.
• Mistake 3 – Not Preheating the Pan: A hot pan is crucial for achieving the perfect puff and char on your pitas. Make sure to preheat the pan or griddle over medium-high heat before adding the rolled-out dough. This will help the pitas rise quickly and develop a lovely golden-brown exterior.
🕒 A Guide to Storing for Later
• Freezing: To freeze, wrap the pitas individually in plastic wrap or foil, then place them in a resealable freezer bag. Freeze for up to 3 months.
• Reheating: For best results, reheat the pitas in a 350°F (175°C) oven for 5-10 minutes, or until warmed through and slightly crisp. You can also lightly toast them in a dry skillet or on a griddle for a few minutes per side.
❓ FAQs
Can I use all whole wheat flour instead of a blend?
While you can use 100% whole wheat flour, the texture and rise of the pitas may be slightly denser. The all-purpose flour helps to balance the heartiness of the whole wheat and create a lighter, airier pita. If you prefer a more wholesome, nutty flavor, start with a 50/50 blend and adjust the ratio to your liking.
How do I know when the pitas are done cooking?
The pitas are ready when they have puffed up significantly and developed light golden-brown spots on both sides. Keep a close eye on them, as they can go from perfectly cooked to overbaked in a matter of seconds. As soon as you see the pitas puff up and the edges start to lightly brown, they’re ready to be removed from the heat.
Can I make the dough in advance?
Absolutely! The pita dough can be made a day in advance and stored in the refrigerator. Simply shape the dough into balls, place them in an airtight container, and refrigerate for up to 24 hours. When ready to use, allow the dough to come to room temperature before rolling and cooking the pitas.
How can I achieve the signature pockets in the pitas?
The key to getting those iconic pockets is in the cooking method. Make sure to cook the pitas over high heat, allowing them to puff up completely before flipping. Avoid overcrowding the pan, as this can cause the pitas to steam instead of sear, resulting in a denser texture. Additionally, be gentle when rolling out the dough to prevent over-working it, which can also hinder the puffing process.
Can I use this recipe to make other flatbread varieties?
Absolutely! This versatile pita dough can be adapted to create a variety of flatbreads, such as naan, lavash, or even pizza crust. Simply adjust the cooking method and shape the dough accordingly. The same basic dough recipe can be used as a starting point for exploring different cultural breads and flavors.
💌 Enjoy Your Delicious Creation!
Savor the fruits of your labor as you bite into a warm, freshly baked pita, its aroma filling the air and transporting you to the bustling markets of the Mediterranean. Stuff it with your favorite fillings, dip it into creamy hummus, or simply enjoy it as a satisfying accompaniment to your meal. This healthy pita bread recipe is a testament to the power of homemade baking, where the simplicity of a few ingredients is transformed into a culinary masterpiece. Bon appétit, and enjoy your delicious creation!
Print
Healthy Pita Bread Recipe
- Total Time: 1.5-2 hours
Ingredients
• 1 cup (120g) whole wheat flour
• 2 cups (240g) all-purpose flour, plus more for dusting
• 1 teaspoon (5g) salt
• 1 teaspoon (5g) instant yeast or active dry yeast
• 1 1/4 cups (295ml) warm water (105-115°F/40-46°C)
• 1 tablespoon (15ml) olive oil, plus more for brushing
Instructions
- Proof the Yeast: In a large bowl, combine the warm water and yeast. Let the mixture sit for 5-10 minutes until the yeast is foamy and activated.
- Mix the Dough: Add the whole wheat flour, all-purpose flour, salt, and olive oil to the proofed yeast mixture. Using a wooden spoon or your hands, mix the ingredients until a shaggy dough forms. Turn the dough out onto a lightly floured surface and knead for about 5-7 minutes, until the dough becomes smooth and elastic.
- First Rise: Place the dough in a lightly greased bowl, cover with a damp towel or plastic wrap, and let it rise for 1-1.5 hours, or until the dough has doubled in size.
- Punch Down and Divide: Gently punch down the dough to release any air bubbles. Divide the dough into 8 equal pieces and shape each piece into a smooth ball.
- Roll and Shape: On a lightly floured surface, use a rolling pin to roll each dough ball into a thin, round circle, about 6-8 inches in diameter. Be gentle to avoid over-working the dough.
- Cook the Pitas: Heat a large, dry skillet or griddle over medium-high heat. Working in batches, carefully transfer the rolled-out pitas to the hot pan. Cook for 1-2 minutes per side, or until the pitas are puffed up and lightly golden brown. Be careful not to overcrowd the pan.
- Brush and Serve: As soon as the pitas come off the heat, brush them lightly with olive oil. Serve the warm pitas immediately, or allow them to cool before storing.
- Prep Time: 20 minutes
- Cook Time: 10-15 minutes
- Category: Lunch
- Cuisine: Americans
Keywords: Healthy Pita Bread Recipe