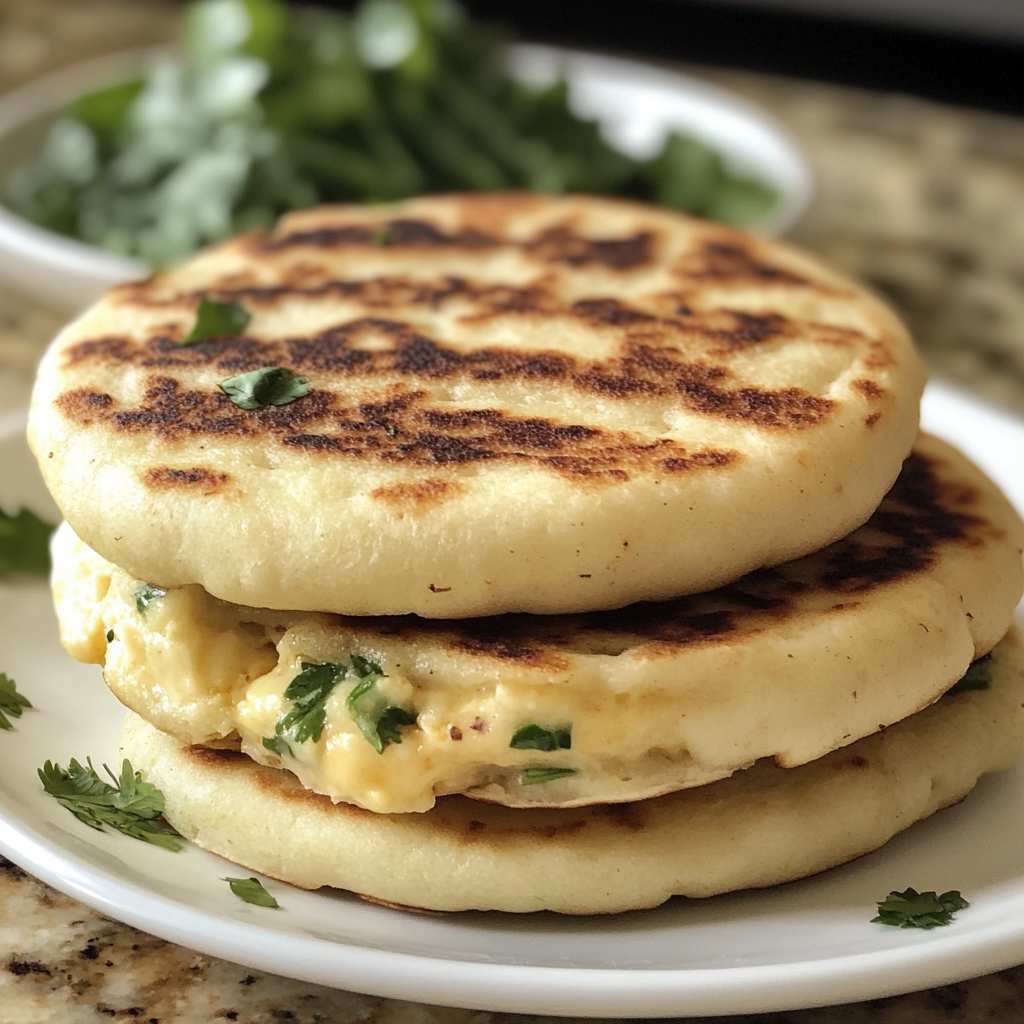
Imagine sinking your teeth into a piping hot, golden-brown arepa, the crisp exterior giving way to a molten, gooey interior. The rich, tantalizing aroma of freshly baked corn mingles with the savory notes of melted cheese, creating a flavor explosion that will have your taste buds dancing with delight. Welcome to the world of Arepas con Queso, a beloved Venezuelan delicacy that’s about to become your new culinary obsession.
These irresistible corn cakes are more than just a simple snack – they’re a cultural touchstone, a symbol of the vibrant and diverse Venezuelan cuisine. Each bite tells a story, transporting you to the bustling streets of Caracas, where vendors hawk their fragrant wares and families gather to savor this beloved comfort food. But don’t be fooled by their humble appearance – Arepas con Queso are a true gastronomic masterpiece, showcasing the perfect balance of textures and flavors.
In this comprehensive guide, we’ll dive deep into the art of making the ultimate Arepas con Queso, revealing the secrets to achieving that perfectly crisp exterior and ooey-gooey center. Whether you’re a seasoned arepa aficionado or a newcomer to this Venezuelan delicacy, you’re in for a culinary adventure that will leave you craving more with every single bite.
🥰 Why You’ll Fall in Love with This Recipe ?
Arepas con Queso are a true feast for the senses, with a flavor profile that will captivate your palate and a texture that will have you reaching for just one more. The combination of the slightly sweet and subtly nutty corn masa, paired with the rich, melted cheese, creates a harmonious blend that is simply irresistible.
What sets this recipe apart is the attention to detail and the use of high-quality ingredients. By starting with a blend of precooked and uncooked corn flour, we achieve a perfect balance of texture and flavor, ensuring that each arepa is light and fluffy on the inside, while maintaining a satisfying crunch on the outside. And the selection of cheese – a mix of traditional queso fresco and shredded mozzarella – takes the filling to new heights of indulgence, melting together to form a luxurious, gooey center that will have you swooning with every bite.
📝 Everything You Need for a Perfect Result
• 1 cup (120g) uncooked corn flour (such as masa harina)
• 1 teaspoon salt
• 1 1/2 cups (355ml) warm water
• 1 cup (113g) crumbled queso fresco
• 1 cup (113g) shredded mozzarella cheese
The key to an authentic arepa lies in the use of a specific type of corn flour – either precooked corn flour (such as Harina PAN) or masa harina. These flours have been treated with lime, which helps to break down the corn’s structure and make it more pliable, resulting in a soft and tender interior. By using a blend of the two, we get the best of both worlds – the structure and chewiness of the uncooked flour, along with the ease of workability from the precooked version.
📖 Follow These Steps for Flawless Results
- Mix the Dough: In a large bowl, combine the precooked corn flour, uncooked corn flour, and salt. Gradually add the warm water, mixing with your hands until a soft, pliable dough forms. Knead the dough for about 2-3 minutes, until it’s smooth and elastic.
- Form the Arepas: Divide the dough into 8 equal pieces and roll each one into a ball. Use your hands to flatten each ball into a round, flat disc, about 1/2 inch thick. Make a small indent in the center of each arepa, using your thumb or the back of a spoon.
- Fill and Seal: In a small bowl, mix together the queso fresco and mozzarella cheese. Spoon about 2-3 tablespoons of the cheese mixture into the indent of each arepa, being careful not to overfill. Gently pinch the dough around the filling to seal the arepa, creating a half-moon shape.
- Cook the Arepas: Heat a large nonstick skillet or griddle over medium heat. Working in batches, carefully place the filled arepas in the hot pan and cook for 4-5 minutes per side, or until golden brown and crispy on the outside. Avoid pressing down on the arepas, as this can cause the filling to ooze out.
- Finish and Serve: Once the arepas are cooked, remove them from the heat and let them rest for a minute or two. Serve the arepas hot, with any desired toppings or condiments, such as avocado, salsa, or sour cream.
⏱️ Timing Overview
• Cook time: 20 minutes
• Total time: 35 minutes
📊 Estimated Nutritional Profile
Nutritional information is an estimate per serving, based on 8 servings.
• Protein: 12 g
• Carbohydrates: 35 g
• Fat: 13 g
• Fiber: 4 g
🌿 Fun Alternatives to Try
• To Make it Vegan: Substitute the cheese fillings with a blend of shredded vegan cheese, such as cashew-based or coconut-based varieties, and adjust the filling quantities as needed.
• To Add a Spicy Kick: Incorporate diced jalapeños or a few teaspoons of your favorite hot sauce into the cheese filling for a delightful burst of heat.
🥂 Perfect Pairings & Serving Suggestions
• Garnish Suggestions: Garnish the arepas with fresh cilantro, a drizzle of creamy avocado sauce, and a sprinkle of toasted crushed peanuts for added crunch.
• Beverage Pairing: This dish pairs wonderfully with a refreshing glass of tropical fruit juice, such as pineapple or passionfruit, or a crisp Venezuelan lager.
❗ Pro Tips for a Perfect Outcome Every Time
• Mistake 2 – Using Cold Ingredients: Bring all the ingredients, especially the water, to room temperature before mixing the dough. Cold ingredients can inhibit the development of gluten and result in a dense, heavy texture.
• Mistake 3 – Not Preheating the Griddle: Make sure your cooking surface is thoroughly preheated before adding the arepas. This will help create that signature golden-brown crust and ensure even cooking throughout.
❄️ Preserve Your Creation: Storage Tips
• Freezing: Arepas con queso can be frozen for up to 3 months. To freeze, wrap each arepa individually in plastic wrap or aluminum foil, then place them in a freezer-safe bag or container.
• Reheating: To reheat, place the frozen or refrigerated arepas on a baking sheet and warm them in a preheated 350°F (175°C) oven for 10-15 minutes, or until heated through and the cheese is melted.
❓ FAQs
Can I use all precooked corn flour instead of a blend?
While you can use all precooked corn flour (such as Harina PAN) to make the arepas, the blend of precooked and uncooked corn flour helps to create a better texture. The uncooked flour contributes to a slightly chewier and more structured interior, while the precooked flour makes the dough more pliable and easier to work with. If you use all precooked flour, the arepas may turn out a bit softer and more delicate.
Is it possible to bake the arepas instead of frying them?
Yes, you can certainly bake the arepas instead of frying them. Preheat your oven to 400°F (200°C) and place the filled arepas on a parchment-lined baking sheet. Bake for 18-22 minutes, flipping halfway, until the arepas are golden brown and crispy on the outside. Keep in mind that the texture will be slightly different, as frying gives the arepas a crispier exterior.
Can I make the arepas ahead of time?
Absolutely! You can prepare the arepa dough in advance and store it in the refrigerator for up to 3 days. When ready to assemble and cook, simply divide the dough, fill, and fry the arepas as directed. This makes for a quick and easy meal prep option.
How can I tell when the arepas are fully cooked?
The arepas are ready when they are golden brown and crispy on the outside, and the cheese filling is melted and oozing out. You can also gently tap the top of an arepa – it should sound hollow and feel light and airy when fully cooked.
Can I use a different type of cheese in the filling?
Certainly! While the traditional queso fresco and mozzarella blend is delicious, you can experiment with other types of cheese as well. Try a combination of Oaxaca, Manchego, or even shredded cheddar for a unique twist on the classic filling.
🎉 Your Culinary Adventure Awaits!
Now that you’ve mastered the art of making the ultimate Arepas con Queso, it’s time to embark on a culinary adventure that will transport your taste buds to the vibrant streets of Venezuela. Gather your friends and family, and let the aroma of freshly baked corn cakes fill your kitchen. Whether you serve them as a main course, a side dish, or a simple snack, these irresistible arepas are sure to become a new favorite in your household. So, what are you waiting for? Dive in and discover the magic of Arepas con Queso!
Print
The Ultimate Arepas con Queso Recipe
- Total Time: 35 minutes
Ingredients
• 2 cups (240g) precooked corn flour (such as Harina PAN)
• 1 cup (120g) uncooked corn flour (such as masa harina)
• 1 teaspoon salt
• 1 1/2 cups (355ml) warm water
• 1 cup (113g) crumbled queso fresco
• 1 cup (113g) shredded mozzarella cheese
Instructions
- Mix the Dough: In a large bowl, combine the precooked corn flour, uncooked corn flour, and salt. Gradually add the warm water, mixing with your hands until a soft, pliable dough forms. Knead the dough for about 2-3 minutes, until it’s smooth and elastic.
- Form the Arepas: Divide the dough into 8 equal pieces and roll each one into a ball. Use your hands to flatten each ball into a round, flat disc, about 1/2 inch thick. Make a small indent in the center of each arepa, using your thumb or the back of a spoon.
- Fill and Seal: In a small bowl, mix together the queso fresco and mozzarella cheese. Spoon about 2-3 tablespoons of the cheese mixture into the indent of each arepa, being careful not to overfill. Gently pinch the dough around the filling to seal the arepa, creating a half-moon shape.
- Cook the Arepas: Heat a large nonstick skillet or griddle over medium heat. Working in batches, carefully place the filled arepas in the hot pan and cook for 4-5 minutes per side, or until golden brown and crispy on the outside. Avoid pressing down on the arepas, as this can cause the filling to ooze out.
- Finish and Serve: Once the arepas are cooked, remove them from the heat and let them rest for a minute or two. Serve the arepas hot, with any desired toppings or condiments, such as avocado, salsa, or sour cream.
- Prep Time: 15 minutes
- Cook Time: 20 minutes
- Category: Breakfast
- Cuisine: Americans
Keywords: The Ultimate Arepas con Queso Recipe