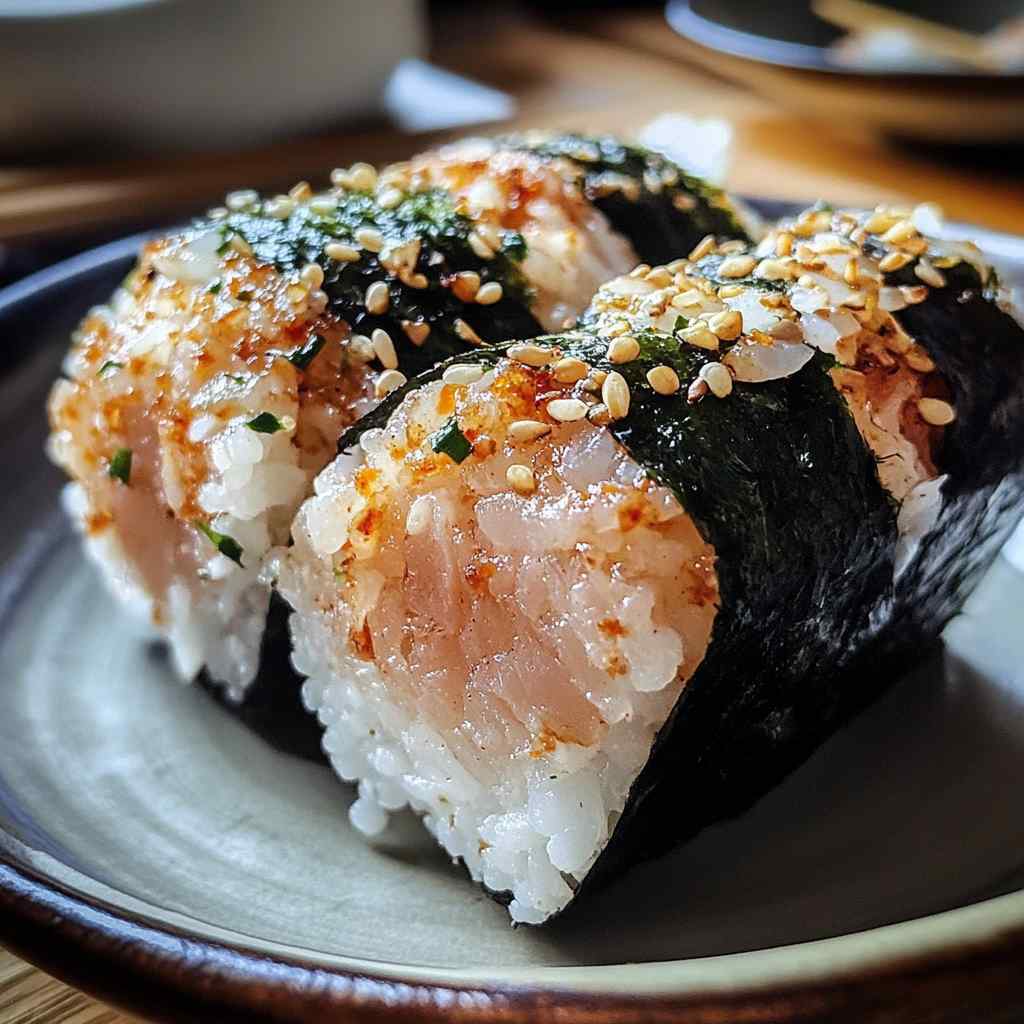
Tuna onigiri, the Japanese rice balls that have captured the hearts and taste buds of food enthusiasts worldwide, are about to become your new culinary obsession. This crowd-pleasing recipe elevates the classic tuna salad filling with a perfect balance of flavors and textures, all wrapped in a pillowy soft, slightly sticky rice exterior. Get ready to embark on a delightful journey of salty, savory deliciousness that will have you coming back for more.
Picture this: you take a bite of the onigiri, and the tender tuna filling bursts with a medley of umami notes, complemented by the subtle sweetness of the rice. The slight crunch of the seaweed wrapping and the satisfying chew of the rice ball create an exquisite sensory experience that will transport you straight to the streets of Japan. This is not just a recipe – it’s a culinary adventure that will leave a lasting impression on your taste buds.
Whether you’re a seasoned sushi enthusiast or new to the world of Japanese cuisine, this tuna onigiri recipe is sure to become a family favorite. With its easy-to-follow instructions and creative variations, you’ll be whipping up these flavorful rice balls in no time, impressing your friends and loved ones with your newfound culinary skills.
🌟 Reasons This Recipe Will Become a Favorite
Tuna onigiri is a true standout in the world of Japanese comfort food, and this recipe is poised to become a household staple. The combination of the savory tuna filling and the fluffy, slightly sticky rice creates a flavor and texture profile that is simply irresistible. Plus, the versatility of this dish makes it a winner for any occasion – from a quick snack to a satisfying main course.
One of the key factors that sets this tuna onigiri recipe apart is the attention to detail in the preparation. By carefully seasoning the tuna filling and using the right techniques to shape the rice balls, you’ll end up with a final product that is not only visually stunning but also bursting with umami goodness in every bite. The recipe also includes helpful tips and tricks to ensure your onigiri turn out perfectly every time, making it a foolproof addition to your culinary arsenal.
🛒 Ingredients: Your Shopping List
• 1/4 cup (60ml) rice vinegar
• 2 tablespoons (30g) granulated sugar
• 1 teaspoon (5g) salt
• 1 (5-ounce/140g) can of tuna, drained and flaked
• 2 tablespoons (30ml) Japanese mayonnaise
• 1 tablespoon (15ml) soy sauce
• 1 teaspoon (5g) sesame oil
• 1/4 cup (10g) dried seaweed sheets (nori), cut into 4-inch squares
The key ingredients that really make this tuna onigiri recipe shine are the Japanese short-grain rice and the high-quality canned tuna. The short-grain rice has the perfect stickiness and texture to hold the onigiri shape, while the tuna provides a rich, savory filling that complements the rice perfectly. The addition of Japanese mayonnaise, soy sauce, and sesame oil in the tuna mixture adds layers of flavor that take this dish to the next level.
🍳 From Prep to Plate: A Detailed Walkthrough
- Cook the Rice: Rinse the short-grain rice until the water runs clear, then add it to a pot with 2 cups of water. Bring the water to a boil, then reduce the heat to low, cover, and simmer for 15-20 minutes, or until the rice is tender and the liquid is absorbed. Remove from heat and let sit, covered, for an additional 10 minutes.
- Season the Rice: In a small bowl, whisk together the rice vinegar, sugar, and salt until the sugar has dissolved. Pour this seasoning mixture over the cooked rice and gently fold it in with a wooden spoon or rubber spatula, being careful not to overmix and break up the grains.
- Prepare the Tuna Filling: In a medium bowl, combine the drained and flaked tuna, Japanese mayonnaise, soy sauce, and sesame oil. Mix well until the filling is evenly seasoned.
- Assemble the Onigiri: Wet your hands and scoop up about 1/4 cup of the seasoned rice. Gently shape it into a triangular or oval shape, using your palms to create a well in the center. Spoon about 1-2 tablespoons of the tuna filling into the well, then use your hands to close the rice around the filling, shaping it into a tight ball or triangle.
- Wrap in Nori: Lay a square of dried seaweed (nori) on a clean surface. Place the onigiri in the center and gently wrap the nori around the rice ball, pressing lightly to adhere.
- Repeat and Serve: Repeat the assembly process with the remaining rice and tuna filling to make 8-10 onigiri. Arrange the finished onigiri on a plate and serve immediately.
⏱️ Timing Overview
• Cook time: 30 minutes
• Total time: 50 minutes
🥗 Nutritional Breakdown Per Serving
Nutritional information is an estimate per serving, based on 10 servings.
• Protein: 8 g
• Carbohydrates: 30 g
• Fat: 4 g
• Fiber: 1 g
🌿 Fun Alternatives to Try
• To Make it Vegan: Replace the tuna with diced, cooked tofu or tempeh. Use a vegan mayonnaise and omit the soy sauce, substituting with a splash of rice vinegar or lemon juice.
• To Add a Spicy Kick: Mix in a teaspoon of sriracha or gochujang (Korean chili paste) to the tuna filling. Sprinkle the finished onigiri with a pinch of red pepper flakes or furikake seasoning.
🎉 Elevate Your Meal with These Serving Tips
• Garnish Suggestions: Garnish the onigiri with a drizzle of toasted sesame oil, a sprinkle of chopped green onions, and a few toasted sesame seeds for a visually appealing and flavorful presentation.
• Beverage Pairing: This dish pairs wonderfully with a crisp Japanese beer, a refreshing green tea, or a fruity, chilled sparkling water.
🔍 Troubleshooting Common Recipe Issues
• Mistake 2 – Using Cold Ingredients: For the best texture and flavor, make sure all the ingredients (rice, tuna filling, and nori) are at room temperature before assembling the onigiri. Cold ingredients can make the rice difficult to shape and the filling less flavorful.
• Mistake 3 – Not Preheating the Oven: If you’re reheating leftover onigiri in the oven, be sure to preheat it to the correct temperature. A cold oven can result in the rice drying out or becoming tough on the outside while remaining undercooked on the inside.
🥡 Smart Storage for Maximum Flavor
• Freezing: Onigiri can be frozen for up to 2 months. Wrap each onigiri individually in plastic wrap or foil, then place in a resealable freezer bag or airtight container.
• Reheating: To reheat frozen onigiri, place them on a baking sheet and warm in a preheated 350°F (175°C) oven for 10-15 minutes, or until heated through. You can also reheat them in the microwave in 30-second intervals until warm.
❓ FAQs
Can I use a different type of canned fish instead of tuna?
Absolutely! While tuna is the classic filling, you can experiment with other types of canned fish, such as salmon, mackerel, or even canned chicken or shredded cooked pork. Just be sure to adjust the seasoning as needed to complement the new filling.
How can I make the onigiri hold their shape better?
The key to keeping the onigiri’s shape is to work with slightly damp hands and to gently but firmly pack the rice around the filling. You can also try lightly moistening your hands with water or a bit of rice vinegar before shaping the onigiri. Additionally, using short-grain Japanese rice, which is stickier than long-grain varieties, will help the onigiri maintain their form.
Can I make the onigiri in advance?
Yes, you can prepare the onigiri in advance and store them for later. Assemble the onigiri and wrap them in the nori sheets, then place them in an airtight container in the refrigerator for up to 3 days. When ready to serve, you can either enjoy them chilled or reheat them in the oven or microwave as needed.
How can I add more vegetables to this recipe?
To make the tuna onigiri even more nutritious, you can mix in finely chopped vegetables like carrots, cucumber, or bell peppers into the tuna filling. You can also try layering the onigiri with a slice of avocado or a spoonful of pickled ginger before wrapping them in the nori.
Can I use brown rice instead of white rice?
While you can use brown rice to make onigiri, the texture and flavor will be slightly different from the traditional version. Brown rice is less sticky and has a nuttier taste. You may need to adjust the cooking time and the amount of seasoning to compensate for the differences in the rice. If you’re looking for a healthier option, brown rice can certainly work, but the classic short-grain white rice will yield the most authentic tuna onigiri experience.
🎉 Your Culinary Adventure Awaits!
Prepare to embark on a flavorful journey with this exceptional tuna onigiri recipe. Whether you’re hosting a casual get-together or looking for a satisfying snack, these rice balls are sure to delight and impress. So gather your ingredients, sharpen your culinary skills, and get ready to savor the perfect balance of savory tuna and fluffy, seasoned rice in every bite. Bon appétit!
Print
The Best Crowd-Pleasing Tuna Onigiri Recipe
- Total Time: 50 minutes
Ingredients
• 2 cups (400g) short-grain Japanese rice, rinsed and drained
• 1/4 cup (60ml) rice vinegar
• 2 tablespoons (30g) granulated sugar
• 1 teaspoon (5g) salt
• 1 (5-ounce/140g) can of tuna, drained and flaked
• 2 tablespoons (30ml) Japanese mayonnaise
• 1 tablespoon (15ml) soy sauce
• 1 teaspoon (5g) sesame oil
• 1/4 cup (10g) dried seaweed sheets (nori), cut into 4-inch squares
Instructions
- Cook the Rice: Rinse the short-grain rice until the water runs clear, then add it to a pot with 2 cups of water. Bring the water to a boil, then reduce the heat to low, cover, and simmer for 15-20 minutes, or until the rice is tender and the liquid is absorbed. Remove from heat and let sit, covered, for an additional 10 minutes.
- Season the Rice: In a small bowl, whisk together the rice vinegar, sugar, and salt until the sugar has dissolved. Pour this seasoning mixture over the cooked rice and gently fold it in with a wooden spoon or rubber spatula, being careful not to overmix and break up the grains.
- Prepare the Tuna Filling: In a medium bowl, combine the drained and flaked tuna, Japanese mayonnaise, soy sauce, and sesame oil. Mix well until the filling is evenly seasoned.
- Assemble the Onigiri: Wet your hands and scoop up about 1/4 cup of the seasoned rice. Gently shape it into a triangular or oval shape, using your palms to create a well in the center. Spoon about 1-2 tablespoons of the tuna filling into the well, then use your hands to close the rice around the filling, shaping it into a tight ball or triangle.
- Wrap in Nori: Lay a square of dried seaweed (nori) on a clean surface. Place the onigiri in the center and gently wrap the nori around the rice ball, pressing lightly to adhere.
- Repeat and Serve: Repeat the assembly process with the remaining rice and tuna filling to make 8-10 onigiri. Arrange the finished onigiri on a plate and serve immediately.
- Prep Time: 20 minutes
- Cook Time: 30 minutes
- Category: Lunch
- Cuisine: Americans
Keywords: The Best Crowd-Pleasing Tuna Onigiri Recipe