The humble rotisserie chicken is the undisputed hero of busy weeknights. Picked up warm and ready from the grocery store, it represents a world of culinary possibility, saving you precious time and effort without sacrificing flavor. This perfectly cooked, succulent chicken is not just a simple meal on its own; it’s a versatile shortcut, a head start on creating a variety of delicious and satisfying dishes that your whole family will love. Forget spending hours in the kitchen after a long day; the heavy lifting has already been done for you.
These five recipes are specifically designed for speed, convenience, and taste. We’ve crafted each one to be approachable for cooks of all skill levels, turning one simple ingredient into a diverse weekly menu. From the cheesy goodness of Speedy Chicken Quesadillas and the fresh crunch of Zesty Chicken & Avocado Tostadas to comforting Homestyle Creamy Chicken Noodle Soup, tangy BBQ Chicken Sliders, and the timeless Classic Chicken Salad Sandwich, you’re about to discover just how far one rotisserie chicken can take you.
Get ready to reclaim your weeknights with these effortless, flavor-packed meals.
🥟 Recipe #5: Speedy Chicken Quesadillas

Your New Favorite
This recipe is the ultimate solution for a fast and satisfying meal that feels like a treat. Crispy, golden-brown tortillas give way to a warm, gooey center of melted cheese and savory shredded chicken, punctuated by the subtle sweetness of sautéed peppers and onions. They are incredibly quick to assemble and cook in minutes, making them perfect for a last-minute dinner, a fun lunch, or even an after-school snack that everyone will devour.
The Building Blocks
| Ingredient | Amount |
|---|---|
| Shredded Rotisserie Chicken | 2 cups |
| Flour Tortillas (8-inch) | 4 |
| Shredded Mexican Cheese Blend | 1 ½ cups |
| Bell Pepper, thinly sliced | ½ |
| Small Onion, thinly sliced | ½ |
| Olive Oil | 1 tbsp |
| Salt and Pepper | To taste |
| Optional Toppings | Sour cream, salsa, guacamole |
Recipe Steps
- Sauté the Vegetables. Heat the olive oil in a medium skillet over medium-high heat. Add the sliced bell pepper and onion. Cook, stirring occasionally, until they are softened and slightly caramelized, about 5-7 minutes. Season with a pinch of salt and pepper. Remove the vegetables from the skillet and set them aside. Wipe the skillet clean for the next step.
- Prepare the Chicken Filling. In a medium bowl, combine the shredded rotisserie chicken, the cooked peppers and onions, and one cup of the shredded Mexican cheese blend. Toss everything together until it is evenly mixed. This mixture is the heart of your quesadilla, ensuring every bite is packed with flavor and texture. Divide the filling into four equal portions.
- Assemble the Quesadillas. Place a clean skillet over medium heat. Lay one flour tortilla flat in the skillet. Sprinkle about two tablespoons of the remaining cheese over the entire surface. Arrange one portion of the chicken filling over one half of the tortilla. Fold the other half of the tortilla over the filling, pressing down gently with a spatula.
- Cook to Golden Perfection. Cook the quesadilla for 2-3 minutes per side, or until the tortilla is golden brown and crispy and the cheese inside is completely melted. Be careful when flipping it. A wide spatula is your best tool for this task. Repeat this process with the remaining tortillas and filling.
- Serve and Enjoy. Once cooked, transfer the quesadilla to a cutting board. Let it rest for a minute before cutting it into wedges with a pizza cutter or a sharp knife. Serve immediately with your favorite toppings like sour cream, fresh salsa, or creamy guacamole for the perfect finishing touch.
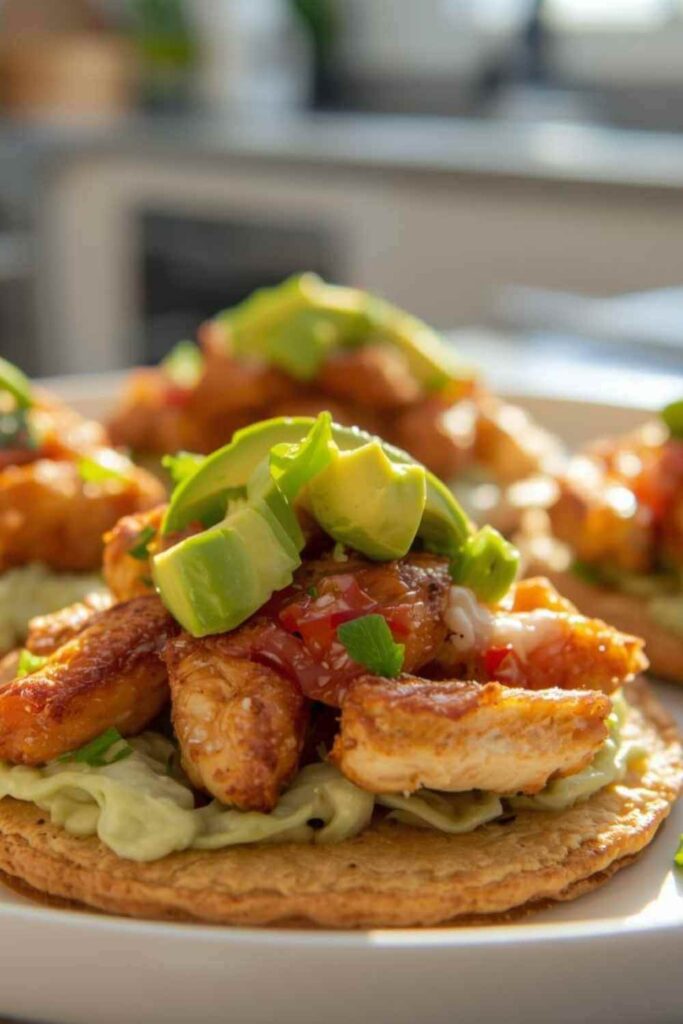
🍨 Recipe #4: Zesty Chicken & Avocado Tostadas
The Art of the Dish
Experience a fiesta of fresh flavors and delightful textures with these no-cook tostadas. The foundation is a crispy, crunchy corn tostada shell, layered with a creamy, lime-infused avocado mash. Tender shredded rotisserie chicken adds savory depth, while a sprinkle of sharp cotija cheese, crisp red onion, and fresh cilantro provides a burst of authentic taste. It’s a light, healthy, and incredibly fast meal that requires zero cooking, perfect for warm evenings.
What Goes Into The Dish
| Ingredient | Amount |
|---|---|
| Shredded Rotisserie Chicken | 2 cups |
| Corn Tostada Shells | 6 |
| Ripe Avocados | 2 |
| Lime | 1 |
| Red Onion, finely diced | ¼ cup |
| Fresh Cilantro, chopped | ¼ cup |
| Cotija Cheese, crumbled | ¼ cup |
| Salt and Pepper | To taste |
Step-by-Step Instructions for Preparing the Recipe at Home
- Prepare the Avocado Mash. Halve the avocados, remove the pits, and scoop the flesh into a medium bowl. Squeeze the juice of one whole lime over the avocado; this not only adds a bright, zesty flavor but also prevents the avocado from browning. Add a pinch of salt and pepper. Using a fork, mash the avocado to your desired consistency—some prefer it chunky, others smooth. Stir in half of the diced red onion and half of the chopped cilantro.
- Season the Chicken. Place the two cups of shredded rotisserie chicken in a separate bowl. You can use it as is, or for extra flavor, you can toss it with a little bit of lime juice, a pinch of chili powder, or cumin if you have them on hand. Gently mix to combine, ensuring the chicken is lightly seasoned but not overpowering the other fresh ingredients.
- Assemble the Tostadas. Now for the fun part. Lay the corn tostada shells flat on your plates or a serving platter. Spread a generous layer of the prepared avocado mash evenly over each tostada shell, creating a creamy base. This layer acts as a delicious ‘glue’ for the chicken and other toppings.
- Layer the Toppings. Divide the seasoned shredded chicken evenly among the tostadas, piling it on top of the avocado mash. Sprinkle the remaining diced red onion and chopped cilantro over the chicken. Finally, finish with a generous crumble of cotija cheese over each tostada. The salty, sharp flavor of the cheese is the perfect final touch.
- Serve Immediately. Tostadas are best enjoyed right after they are assembled to ensure the shells remain crispy. Serve them immediately for a light lunch or a quick and refreshing weeknight dinner. No cooking required, just simple, fresh, and delicious results that are sure to impress.
🍗 Recipe #3: 15-Minute BBQ Chicken Sliders

What Makes This Recipe Special
Get ready for a crowd-pleasing favorite that delivers big, bold flavor in a small package. These sliders feature tender, juicy rotisserie chicken smothered in a sweet and tangy barbecue sauce, all piled onto soft, buttery slider buns. A topping of crisp, creamy coleslaw adds a refreshing crunch and cuts through the richness of the BBQ sauce, creating a perfectly balanced bite. They are incredibly simple to make and are perfect for game day, a casual party, or a fun family dinner.
Your Shopping List
| Ingredient | Amount |
|---|---|
| Shredded Rotisserie Chicken | 3 cups |
| Your Favorite BBQ Sauce | 1 cup |
| Slider Buns | 12 |
| Bagged Coleslaw Mix | 2 cups |
| Mayonnaise | ½ cup |
| Apple Cider Vinegar | 1 tbsp |
| Sugar | 1 tsp |
| Butter, melted | 2 tbsp |
Cooking Instructions
- Prepare the BBQ Chicken. In a medium saucepan, combine the shredded rotisserie chicken and your favorite barbecue sauce. Stir well to ensure all the chicken is thoroughly coated. Place the saucepan over medium-low heat and cook, stirring occasionally, for about 5-7 minutes, or until the chicken is heated through. This step allows the chicken to absorb the smoky, tangy flavors of the sauce.
- Make the Quick Coleslaw. While the chicken is warming, prepare the simple coleslaw topping. In a separate bowl, whisk together the mayonnaise, apple cider vinegar, and sugar until smooth. Add the bagged coleslaw mix to the dressing and toss until the cabbage and carrots are evenly coated. Season with a pinch of salt and pepper to taste. Set it aside.
- Toast the Buns. Preheat your oven’s broiler or a toaster oven. Separate the slider buns and arrange them on a baking sheet, cut-side up. Brush the melted butter evenly over the cut surfaces of both the tops and bottoms of the buns. Place them under the broiler for 1-2 minutes, watching carefully, until they are lightly toasted and golden brown. This adds a wonderful buttery flavor and prevents the buns from getting soggy.
- Assemble the Sliders. Once the buns are toasted, it’s time to build your sliders. Place the bottom half of the buns on a serving platter. Using a slotted spoon to drain any excess sauce, pile a generous amount of the warm BBQ chicken mixture onto each bottom bun. This prevents the buns from becoming too saturated with sauce.
- Add the Finishing Touch and Serve. Top the BBQ chicken on each slider with a spoonful of the crisp, creamy coleslaw. The contrast in temperature and texture is what makes these sliders so irresistible. Place the top half of the toasted buns on top of the coleslaw, gently pressing down. Serve the sliders immediately while the chicken is warm and the buns are toasty.
🥑 Recipe #2: Homestyle Creamy Chicken Noodle Soup

The Story Behind the Flavor
This recipe is pure comfort in a bowl, a classic dish that soothes the soul and warms you from the inside out. Using rotisserie chicken makes this homestyle soup come together in a fraction of the time without sacrificing any of the deep, savory flavor you crave. Tender chunks of chicken, soft egg noodles, and hearty vegetables swim in a rich, creamy broth that’s both light and satisfying. It’s the perfect remedy for a chilly day or whenever you need a little taste of home.
Recipe Components
| Ingredient | Amount |
|---|---|
| Shredded Rotisserie Chicken | 2 cups |
| Chicken Broth | 6 cups |
| Wide Egg Noodles | 3 cups, uncooked |
| Carrots, sliced | 2 |
| Celery Stalks, sliced | 2 |
| Onion, chopped | 1 |
| Olive Oil | 1 tbsp |
| Heavy Cream or Half-and-Half | ½ cup |
| Dried Thyme | 1 tsp |
| Fresh Parsley, chopped | 2 tbsp |
| Salt and Black Pepper | To taste |
Simple Directions
- Sauté the Foundation. Heat the olive oil in a large pot or Dutch oven over medium heat. Add the chopped onion, sliced carrots, and sliced celery—the classic mirepoix. Cook for about 5-7 minutes, stirring occasionally, until the vegetables have softened and the onion becomes translucent. This step builds the aromatic base of your soup.
- Build the Broth. Pour the chicken broth into the pot with the sautéed vegetables. Add the dried thyme, a generous pinch of salt, and a few grinds of black pepper. Bring the liquid to a rolling boil over medium-high heat. This process infuses the broth with the flavors of the vegetables and herbs.
- Cook the Noodles. Once the broth is boiling, add the uncooked wide egg noodles. Stir them gently to prevent sticking. Reduce the heat to a simmer and cook for about 8-10 minutes, or until the noodles are tender and cooked through, according to the package directions. The noodles will absorb some of the flavorful broth as they cook.
- Add the Stars of the Show. When the noodles are just about done, stir in the shredded rotisserie chicken. Since the chicken is already cooked, it only needs to heat through. Reduce the heat to low. Slowly pour in the heavy cream or half-and-half, stirring constantly until it’s fully incorporated. Allow the soup to heat gently for another minute or two, but do not let it boil again after adding the cream.
- Garnish and Serve. Remove the pot from the heat. Stir in the fresh chopped parsley for a burst of color and freshness. Taste the soup one last time and adjust the seasoning with more salt and pepper if needed. Ladle the hot, creamy soup into bowls and serve immediately for a comforting and hearty meal.
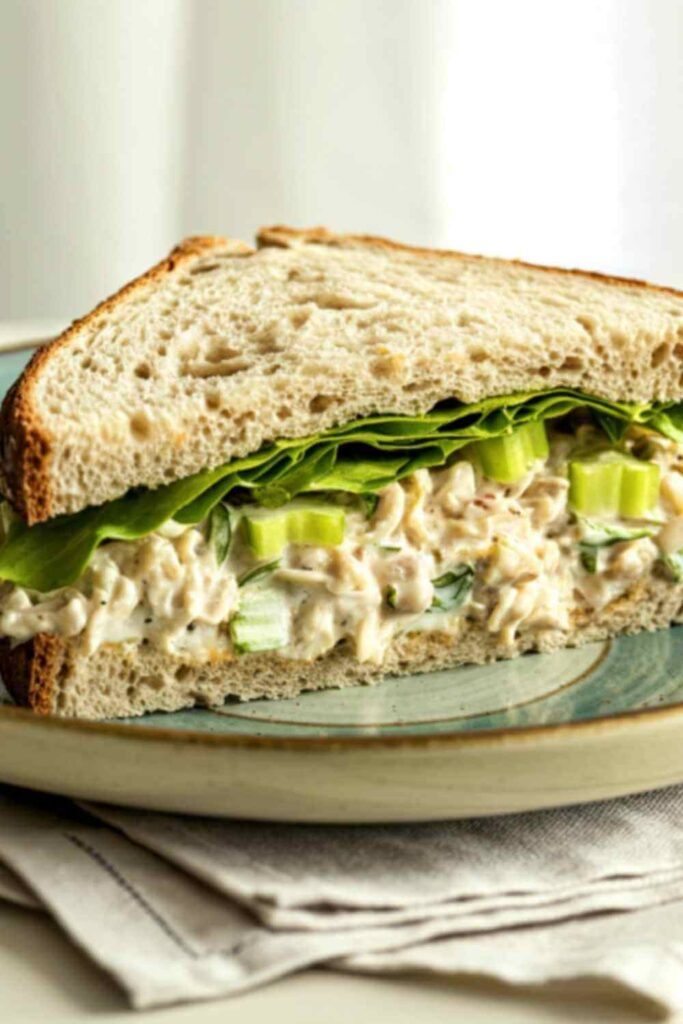
🥟 Recipe #1: Classic Chicken Salad Sandwiches
Why You’ll Love This Dish
This is the quintessential recipe for leftover chicken, transformed into a timeless and beloved classic. The beauty of this chicken salad lies in its perfect balance of textures and flavors: tender shredded chicken, a creamy and tangy mayonnaise dressing, the crisp crunch of fresh celery, and a slight bite from finely diced red onion. It’s an incredibly simple, no-cook recipe that’s perfect for a quick lunch, a light dinner, or preparing ahead for easy meals throughout the week.
Ingredients Checklist
| Ingredient | Amount |
|---|---|
| Shredded Rotisserie Chicken | 3 cups |
| Mayonnaise | ¾ cup |
| Celery Stalk, finely chopped | 1 |
| Red Onion, finely chopped | ¼ cup |
| Lemon Juice | 1 tbsp |
| Dijon Mustard | 1 tsp |
| Salt and Black Pepper | To taste |
| Bread Slices or Croissants | 8 |
| Lettuce Leaves | 4-8 |
The Best Way to Prepare the Recipe
- Prepare the Chicken. Ensure your rotisserie chicken is completely cooled before you begin. You can either shred the chicken by hand or chop it into small, bite-sized pieces, depending on your preferred texture. Place the 3 cups of prepared chicken into a large mixing bowl. Make sure to remove any remaining skin or bones for the best consistency.
- Create the Creamy Dressing. In a separate, smaller bowl, combine the mayonnaise, fresh lemon juice, and Dijon mustard. Whisk these ingredients together until you have a smooth and creamy dressing. The lemon juice adds a crucial brightness that cuts through the richness of the mayonnaise, while the Dijon adds a subtle, tangy depth of flavor.
- Combine the Salad Ingredients. Add the finely chopped celery and red onion to the large bowl with the chicken. Pour the prepared dressing over the chicken and vegetables. Using a spatula or large spoon, gently fold everything together until the chicken is evenly coated in the creamy dressing. Be careful not to overmix, as you want to maintain some of the chicken’s texture.
- Season and Chill. Season the chicken salad mixture with salt and freshly ground black pepper to your taste. Mix it one last time to incorporate the seasonings. For the best flavor, cover the bowl and chill the chicken salad in the refrigerator for at least 30 minutes. This allows the flavors to meld together beautifully.
- Assemble and Serve. When you’re ready to eat, assemble your sandwiches. Lay out your bread slices or croissants. Place a few crisp lettuce leaves on the bottom slices of bread. Spoon a generous amount of the chilled chicken salad onto the lettuce. Top with the remaining bread slices, slice the sandwiches in half if desired, and serve immediately. This chicken salad is also delicious served on a bed of greens or with crackers.
Quick Tips for Success
- Shred with Ease: The easiest way to shred a rotisserie chicken is while it’s still warm. Use two forks to pull the meat apart effortlessly. For an even faster method, you can place the deboned, skinless chicken meat in the bowl of a stand mixer fitted with the paddle attachment and run it on low speed for about 15-20 seconds.
- Don’t Waste the Carcass: The flavor doesn’t end with the meat. Use the leftover chicken carcass and bones to make a rich, flavorful homemade chicken stock. Simply place it in a pot, cover with water, add some vegetable scraps like onion ends and carrot peels, and simmer for a few hours.
- Proper Storage: Store leftover shredded rotisserie chicken in an airtight container in the refrigerator for up to four days. This makes it incredibly easy to pull out just what you need for these quick recipes throughout the week.
- Meal Prep Champion: As soon as you get home from the store, take ten minutes to pull all the meat off the bones and shred it. Store it in a container in the fridge. This simple prep step will make assembling these meals even faster when you’re short on time.
- Smart Substitutions: Feel free to customize these recipes. You can substitute Greek yogurt for mayonnaise in the chicken salad for a lighter, tangier version. In the quesadillas, any meltable cheese like Monterey Jack or cheddar will work wonderfully. Don’t have slider buns? Use dinner rolls instead.
- Boost the Flavor: A squeeze of fresh citrus, a handful of fresh herbs like cilantro, parsley, or dill, or a dash of your favorite hot sauce can elevate any of these dishes. Don’t be afraid to experiment with spices like smoked paprika, cumin, or garlic powder to tailor the flavors to your liking.
In Conclusion
A single rotisserie chicken is more than just a meal; it’s a strategy for a less stressful, more delicious week. By leveraging this ultimate convenience food, you unlock the potential for numerous creative and speedy dishes that break the monotony of weeknight cooking.
Embrace these recipes as a starting point and enjoy the freedom and flavor that come from having a secret weapon in your culinary arsenal.