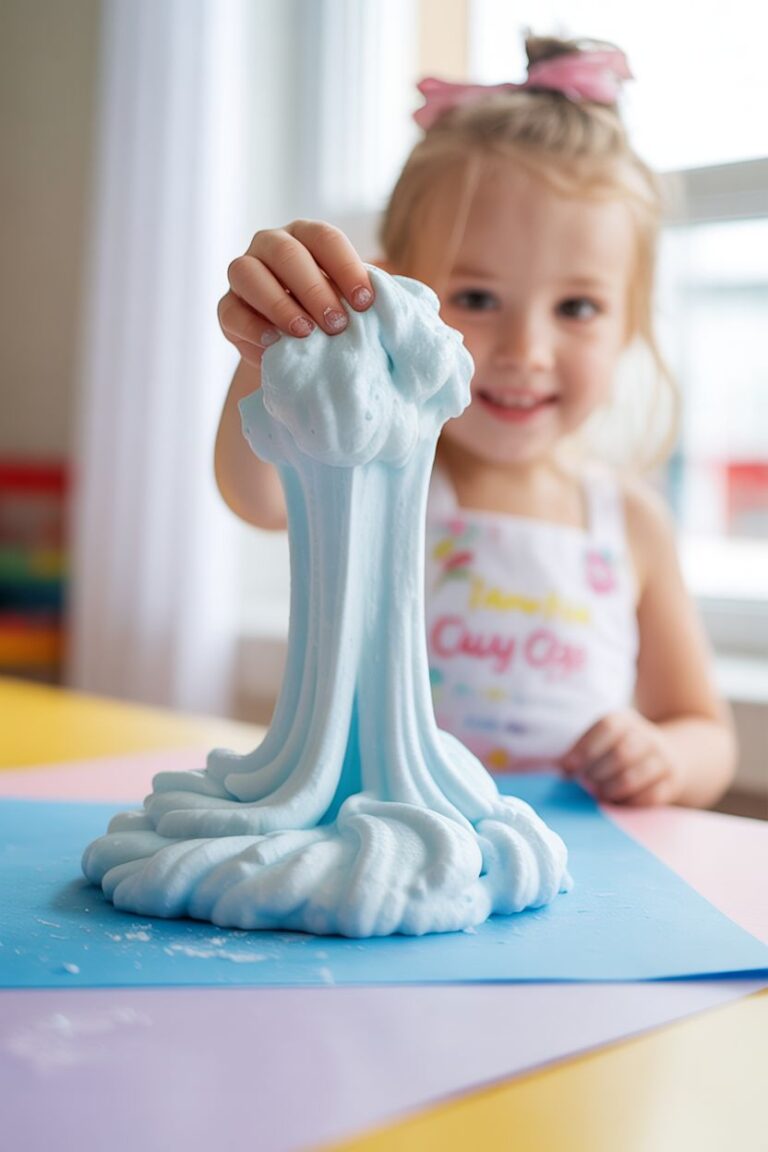
If you’ve ever seen those satisfying, puffy, cloud-like slimes on social media, you’ve probably wondered how to make one yourself. Welcome to the world of fluffy slime — the ultimate sensory play activity that’s irresistibly soft, stretchy, and fun!
The fluffy slime recipe is not just a fun craft but also a creative and relaxing activity for both kids and adults. Unlike regular slime, fluffy slime has a light, airy texture, thanks to the addition of shaving cream. It’s smooth to the touch, holds its shape for longer, and makes a satisfying “squish” sound when played with.
Whether you’re hosting a playdate, crafting day, or just looking for a way to spark creativity, this recipe will show you step-by-step how to make fluffy slime at home with easy-to-find ingredients. The best part? You can customize it with colors, glitter, or scents for a truly personal touch.
Let’s dive into the soft, stretchy magic of homemade fluffy slime!
💖 Why You’ll Love This Recipe ?
There are many reasons why this fluffy slime recipe has become a viral favorite among parents, teachers, and craft lovers:
- Simple ingredients: Everything you need can be found in your home or local store — glue, shaving cream, and a few other basics.
- Customizable: You can add food coloring, glitter, or scents to make your slime unique.
- Fun sensory activity: The texture of fluffy slime is perfect for sensory play — it’s soft, squishy, and satisfying.
- Kid-friendly: It’s safe and non-toxic when made correctly, making it a great family project.
- Stress-relieving: Playing with fluffy slime can help relieve anxiety and improve focus.
- Reusable: When stored properly, your fluffy slime can last for days of fun.
It’s one of those DIY crafts that’s equally enjoyable to make and play with.
Ingredients
Here’s what you’ll need to create the softest, fluffiest slime possible:
Shaving cream – 3 to 4 cups (for fluffiness)
Baking soda – 1 teaspoon
Contact lens solution – 1 to 2 tablespoons (with boric acid and sodium borate)
Food coloring – a few drops (optional)
Water – ½ cup
Mixing bowl
Spoon or spatula
Measuring cups and spoons
Storage container (airtight)
Instructions
Let’s get into the fun part — making the slime! Follow these simple steps carefully for perfect, fluffy results every time.
In a large mixing bowl, pour 1 cup of white glue. Add ½ cup of water and stir until the mixture is smooth and consistent. This helps the glue spread evenly later.
Now for the magic! Add 3 to 4 cups of shaving cream to the bowl. The more shaving cream you add, the fluffier your slime will be. Mix thoroughly until the mixture becomes thick, airy, and well combined.
If you’d like colored slime, add a few drops of food coloring at this stage. Mix until the color is evenly distributed. You can even divide the batch and create multiple colors for a rainbow effect.
Stir in 1 teaspoon of baking soda. This helps stabilize the slime and improve its texture.
Slowly add 1 tablespoon of contact lens solution while stirring. You’ll notice the slime starting to form and pull away from the sides of the bowl. If it’s still sticky, add a little more contact solution — a few drops at a time — until it reaches the perfect consistency.
Once the slime begins to hold together, take it out of the bowl and start kneading with your hands. Stretch, pull, and fold it for 3–5 minutes. It will become less sticky and more elastic as you go.
When not in use, store your fluffy slime in an airtight container to keep it soft and playable for days.
🎨 Variations
You can easily personalize your fluffy slime by experimenting with different styles and ingredients:
- Rainbow Slime: Divide your batch into several bowls, add different food colors, and swirl them together gently.
- Glitter Slime: Mix in glitter for a sparkling effect that kids will love.
- Scented Slime: Add a few drops of essential oil (like lavender or vanilla) for a pleasant aroma.
- Glow-in-the-Dark Slime: Use glow pigment powder or glow-in-the-dark paint to create nighttime fun.
- Metallic or Unicorn Slime: Mix metallic paint or iridescent powder for a magical shimmer.
🍶 Craft Note
- Activator caution: Too much contact solution can make your slime stiff; add slowly and mix well.
- Type of glue matters: White school glue gives soft slime; clear glue creates a shinier, stretchy version.
- Storage: Always store your slime in an airtight container at room temperature — never refrigerate it.
- Rehydrate: If it becomes dry, add a small drop of water or shaving cream and knead again.
🍭 Serving Suggestions (for Play!)
While you don’t eat slime, there are fun ways to “serve” it for playtime:
- Give each child a small cup or jar of colorful slime to personalize.
- Use cookie cutters to shape the slime into stars, hearts, or animals.
- Add small beads or foam balls for a “crunchy slime” texture.
- Host a “Slime Party” — provide multiple colors and decorations for creative mixing.
💡 Helpful Tips
- Always use fresh shaving cream; old foam can affect texture.
- Mix slowly — overmixing may cause bubbles or reduce fluffiness.
- If your slime feels sticky, add a few more drops of contact solution.
- Wash hands before and after playing to keep slime clean.
- Avoid carpet and fabric surfaces — slime can stick!
🧁 Tips for the Best Fluffy Slime
- Use the right activator: Ensure your contact solution contains boric acid or sodium borate; without it, the slime won’t form properly.
- Don’t rush kneading: Kneading helps activate the slime evenly, giving it that smooth, stretchy finish.
- Adjust texture: For extra fluff, add more shaving cream; for more stretch, add a tiny bit of water.
- Avoid over-activating: Too much activator can make your slime rubbery instead of fluffy.
- Play frequently: Regular use helps maintain softness — the more you play, the better it gets!
⏱️ Timing Overview
Prep Time: 5 minutes
Mixing Time: 10 minutes
Total Time: 15 minutes
❓ FAQs
Q1: Why is my slime sticky?
A: You might need a little more activator. Add a few drops of contact lens solution and knead until it’s smooth.
Q2: Can I use clear glue instead of white glue?
A: Yes! It will make your slime more translucent and glossy, but slightly less fluffy.
Q3: How long does fluffy slime last?
A: If stored properly, it can last up to a week or more. Keep it in an airtight container to prevent drying.
Q4: Can I make this without borax?
A: Yes! Using contact lens solution (with boric acid) is a borax-free and safer method for kids.
Q5: Can I freeze slime?
A: Freezing is not recommended — it ruins the texture and consistency.
Q6: How to fix hard slime?
A: Add a little water or shaving cream, then knead again to restore softness.
🎀 Conclusion
Making fluffy slime at home is not only fun but also a wonderful creative activity for kids and adults alike. It combines science, creativity, and sensory play all in one. With simple ingredients and a few minutes of mixing, you can create your own soft, stretchy, and bouncy slime masterpiece.
Experiment with colors, glitters, and scents to personalize your slime creations. The joy of watching it puff up, stretch, and squish between your fingers is truly satisfying. Remember to store it well, play responsibly, and most importantly — have fun!
So grab that glue, shaving cream, and activator, and start crafting your perfect batch of fluffy slime today!

30-Minute Fluffy Slime Recipe
⏱️ Timing Overview
🥘 Ingredients
📝 Instructions
- Cover your table or countertop with parchment paper or an old tablecloth. Slime-making can get a little messy! Gather all your ingredients and tools before starting.
- In a large mixing bowl, pour 1 cup of white glue. Add ½ cup of water and stir until the mixture is smooth and consistent. This helps the glue spread evenly later.
- Now for the magic! Add 3 to 4 cups of shaving cream to the bowl. The more shaving cream you add, the fluffier your slime will be. Mix thoroughly until the mixture becomes thick, airy, and well combined.
- If you’d like colored slime, add a few drops of food coloring at this stage. Mix until the color is evenly distributed. You can even divide the batch and create multiple colors for a rainbow effect.
- Stir in 1 teaspoon of baking soda. This helps stabilize the slime and improve its texture.
- Slowly add 1 tablespoon of contact lens solution while stirring. You’ll notice the slime starting to form and pull away from the sides of the bowl. If it’s still sticky, add a little more contact solution — a few drops at a time — until it reaches the perfect consistency.
- Once the slime begins to hold together, take it out of the bowl and start kneading with your hands. Stretch, pull, and fold it for 3–5 minutes. It will become less sticky and more elastic as you go.
- When not in use, store your fluffy slime in an airtight container to keep it soft and playable for days.