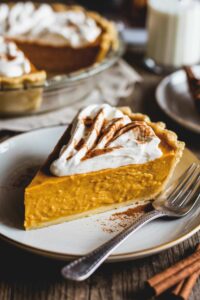
Fall is in the air, and that means it’s time to indulge in the ultimate comfort food – pumpkin pie! But for those following a gluten-free diet, finding a recipe that delivers the same rich, creamy texture and warm spices can be a challenge. Until now. Prepare to be amazed by this simple gluten-free pumpkin pie recipe that will have your taste buds dancing with joy.
Growing up, pumpkin pie was always the star of our Thanksgiving table. The aroma of freshly baked pie wafting through the house was enough to make anyone’s mouth water. But as I got older and discovered I needed to avoid gluten, I resigned myself to the idea that I might never again experience the joy of a perfectly spiced pumpkin pie. That is, until I stumbled upon this game-changing recipe.
Let me tell you, this gluten-free pumpkin pie is no compromise. It’s a masterpiece in its own right, with a silky-smooth filling that melts in your mouth and a flaky crust that rivals any traditional version. Whether you’re catering to dietary restrictions or simply looking to mix up your holiday dessert lineup, this recipe is sure to become a new family favorite.
🍂 What Sets This Amazing Recipe Apart?
What makes this gluten-free pumpkin pie so extraordinary? For starters, the use of a carefully curated gluten-free flour blend ensures a tender, flaky crust that rivals even the glutinous version. But the real magic happens in the filling. By striking the perfect balance of warm spices, creamy pumpkin, and just the right amount of sweetness, this recipe delivers a flavor profile that will have you craving more with every bite.
But the real clincher? The texture. So many gluten-free baked goods can come out dense or gritty, but this pumpkin pie is anything but. The silky, velvety filling practically melts on your tongue, creating an indulgent experience that will leave you wondering how it’s possible that it’s gluten-free.
Ingredients
• 1 (14 oz) can sweetened condensed milk
• 2 large eggs
• 1 teaspoon ground cinnamon
• 1/2 teaspoon ground ginger
• 1/4 teaspoon ground cloves
• 1/4 teaspoon ground nutmeg
• 1/4 teaspoon salt
• 1 pre-baked 9-inch gluten-free pie crust
The key to this recipe’s success lies in the combination of ingredients. Pumpkin puree provides the base, lending its signature flavor and moisture, while sweetened condensed milk adds a rich, creamy texture and just the right amount of sweetness. The warm spices – cinnamon, ginger, cloves, and nutmeg – work in perfect harmony to create that quintessential pumpkin pie flavor profile.
But the real star of the show is the gluten-free pie crust. By using a carefully crafted blend of gluten-free flours, such as rice flour, tapioca flour, and xanthan gum, you can achieve a crust that is tender, flaky, and sturdy enough to hold the decadent filling. No more crumbly, dry crusts – this one is a true game-changer.
Instructions
- Prepare the Filling: In a large bowl, whisk together the pumpkin puree, sweetened condensed milk, eggs, cinnamon, ginger, cloves, nutmeg, and salt until well combined. Pour the filling into the pre-baked gluten-free pie crust, smoothing the top with a spatula.
- Bake the Pie: Preheat your oven to 425°F (220°C). Bake the pie for 15 minutes, then reduce the temperature to 350°F (175°C) and continue baking for an additional 40-45 minutes, or until the center is almost set. The edges should be golden brown and the center should still have a slight jiggle. Keep an eye on the crust during the last 10-15 minutes of baking and cover the edges with foil or a pie shield if they start to brown too quickly.
- Cool and Chill: Remove the pie from the oven and allow it to cool completely on a wire rack, about 2 hours. Once cooled, transfer the pie to the refrigerator and chill for at least 4 hours, or up to 3 days, before serving.
⏱ Timing Overview
• Cook time: 55-60 minutes
• Chill time: 4 hours
• Total Time: 5 hours 15 minutes
🍽 Nutritional Information
Nutritional information is an estimate per serving, based on 8 servings.
• Protein: 7 g
• Sodium: 334 mg
• Carbohydrates: 45 g
• Fat: 15 g
• Fiber: 2 g
🤩 Creative Twists and Variations
• To Make it Vegan: Substitute the eggs with 1/2 cup of unsweetened applesauce or a commercial egg replacer. Use dairy-free sweetened condensed milk in place of the regular version.
• To Add a Spicy Kick: Stir in 1/4 to 1/2 teaspoon of ground cayenne pepper or a few drops of hot sauce to the filling for a subtle heat that complements the warm spices.
🍴 Elevate Your Meal with These Serving Tips
• Garnish Suggestions: Garnish each slice with a dollop of whipped cream (or dairy-free whipped topping), a sprinkle of chopped toasted pecans or walnuts, and a light dusting of ground cinnamon for an extra touch of elegance.
• Beverage Pairing: This dish pairs wonderfully with a smooth, rich cup of coffee or a spiced apple cider for a cozy, autumnal experience.
💡 Pro Tips for a Perfect Outcome Every Time
• Mistake 2 – Using Cold Ingredients: Ensure all the ingredients, especially the eggs and sweetened condensed milk, are at room temperature before beginning. This will help the filling come together smoothly and bake evenly.
• Mistake 3 – Not Preheating the Oven: Properly preheating the oven is crucial for achieving the perfect rise and set of the pumpkin pie filling. Don’t skip this important step!
🥡 A Guide to Storing for Later
• Freezing: Pumpkin pie freezes beautifully! Wrap the completely cooled pie tightly in plastic wrap, then foil, and freeze for up to 3 months. Thaw in the refrigerator overnight before serving.
• Reheating: To reheat a slice of pumpkin pie, place it on a baking sheet and warm in a 350°F (175°C) oven for 10-15 minutes, or until heated through. You can also microwave individual slices for 30-60 seconds.
❓ FAQs
Can I use fresh pumpkin puree instead of canned?
Absolutely! Fresh pumpkin puree can be used in place of canned with great results. Just be sure to roast and puree the pumpkin until smooth before using in the recipe. You may need to adjust the baking time slightly, as fresh pumpkin may have a higher moisture content.
How can I ensure a crisp, flaky crust?
The key to a crisp, flaky gluten-free pie crust is to work the dough as little as possible and to chill it thoroughly before baking. Additionally, pre-baking the crust before adding the filling will help create a sturdy, golden-brown base that won’t get soggy.
Can I make this pie ahead of time?
Yes, this pumpkin pie can be made up to 3 days in advance. Simply bake the pie, allow it to cool completely, then refrigerate it until ready to serve. For the best texture, I recommend chilling the pie for at least 4 hours before slicing and serving.
How can I tell when the pie is fully baked?
The pie is done when the edges are set and the center still has a slight jiggle. The internal temperature should reach 175°F (80°C). Keep in mind that the pie will continue to set as it cools, so it’s important not to over-bake.
Can I make this pie dairy-free?
Yes, you can easily make this pumpkin pie dairy-free by using a dairy-free sweetened condensed milk alternative. Coconut milk or almond milk work great in place of the traditional sweetened condensed milk.
🍁 Wrapping It Up
This gluten-free pumpkin pie is the ultimate autumn indulgence, perfectly balancing warmth, creaminess, and just the right amount of sweetness. Whether you’re hosting a holiday gathering or simply craving a cozy slice of pie, this recipe is sure to delight. So go ahead, give it a try, and prepare to be amazed by the magic of this gluten-free masterpiece. Your taste buds (and your guests) will thank you!
Simple Gluten Free Pumpkin Pie Recipe
⏱️ Timing Overview
🥘 Ingredients
📝 Instructions
- In a large bowl, whisk together the pumpkin puree, sweetened condensed milk, eggs, cinnamon, ginger, cloves, nutmeg, and salt until well combined. Pour the filling into the pre-baked gluten-free pie crust, smoothing the top with a spatula.
- Preheat your oven to 425°F (220°C). Bake the pie for 15 minutes, then reduce the temperature to 350°F (175°C) and continue baking for an additional 40-45 minutes, or until the center is almost set. The edges should be golden brown and the center should still have a slight jiggle. Keep an eye on the crust during the last 10-15 minutes of baking and cover the edges with foil or a pie shield if they start to brown too quickly.
- Remove the pie from the oven and allow it to cool completely on a wire rack, about 2 hours. Once cooled, transfer the pie to the refrigerator and chill for at least 4 hours, or up to 3 days, before serving.