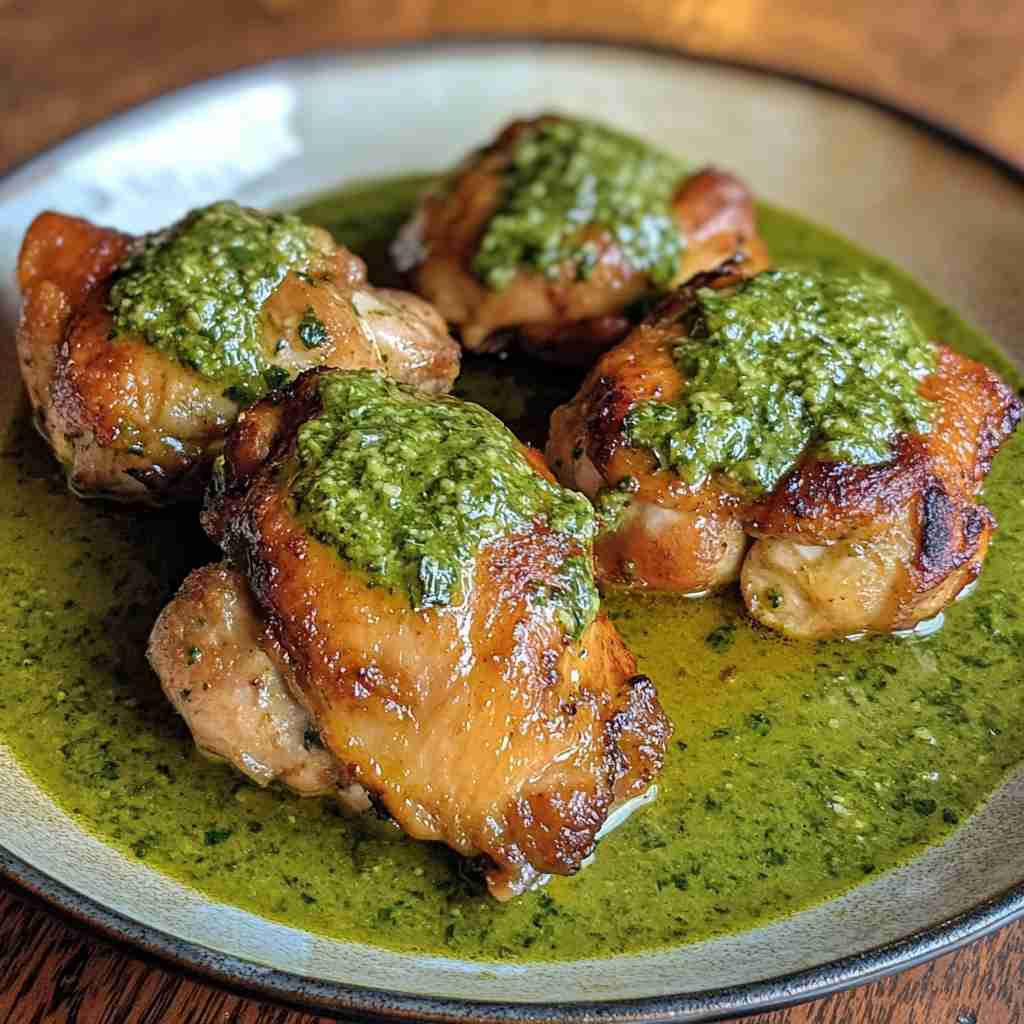
The aroma of sizzling chicken and the tantalizing scent of a vibrant green sauce fill the air, instantly transporting you to the vibrant streets of Peru. This classic Peruvian chicken dish, with its perfectly crisp skin and juicy, flavorful meat, is a true crowd-pleaser that will have your taste buds dancing with delight. Get ready to embark on a culinary adventure that will leave you craving more.
Peruvian cuisine is renowned for its exceptional flavors, blending the rich heritage of indigenous cultures with the influences of Spanish, African, and Asian cuisines. At the heart of this gastronomic symphony lies the iconic pollo a la brasa, or Peruvian-style roasted chicken, paired with a tantalizing green sauce that adds a fresh, herbal kick to every bite.
In this recipe, we’ll unveil the secrets behind this irresistible dish, guiding you through every step to ensure you achieve the perfect balance of flavors and textures. So, let’s dive in and discover the magic of Peruvian chicken with green sauce!
✨ The Secret Behind This Irresistible Dish
The key to this Peruvian chicken’s unparalleled flavor lies in the marinade and the preparation method. The chicken is first brined in a simple yet flavorful mixture of salt, garlic, and spices, which infuses the meat with a depth of flavor that sets it apart from your average roasted chicken. The brining process also helps to lock in the juices, resulting in a tender, succulent bite with every mouthful.
But the real magic happens during the cooking process. The chicken is roasted at a high temperature, which creates a perfectly crisp skin that shatters with each forkful, revealing the juicy, aromatic flesh underneath. The secret? Placing the chicken on a bed of fresh herbs and citrus slices, which not only imparts additional flavor but also helps to elevate the chicken, ensuring even cooking and browning.
Ingredients
• 1/4 cup kosher salt
• 3 garlic cloves, minced
• 2 teaspoons ground cumin
• 2 teaspoons paprika
• 1 teaspoon dried oregano
• 1/2 teaspoon black pepper
• 1 lemon, sliced
• 1 bunch fresh cilantro
• 1 bunch fresh parsley
The green sauce is the perfect accompaniment to the Peruvian-style chicken, providing a vibrant, herbal counterpoint to the rich, savory meat. The sauce is made by blending together a mix of fresh cilantro, parsley, garlic, lime juice, and a touch of olive oil. The result is a creamy, flavorful sauce that perfectly complements the crisp-skinned chicken.
Instructions
- Brine the Chicken: In a large bowl, combine the kosher salt, garlic, cumin, paprika, oregano, and black pepper. Add the whole chicken and rub the seasoning mixture all over the skin and inside the cavity. Cover the bowl and refrigerate for at least 2 hours, or up to 24 hours. This brining process will ensure the chicken is seasoned all the way through and help lock in moisture during cooking.
- Preheat the Oven: Preheat your oven to 425°F (220°C). Arrange the lemon slices and half of the cilantro and parsley in the bottom of a large roasting pan or baking dish. This will create a flavorful bed for the chicken to sit on.
- Roast the Chicken: Remove the brined chicken from the refrigerator and place it breast-side up on the lemon and herb bed. Tuck the wing tips under the body and tie the legs together with kitchen string. Roast the chicken for 45-55 minutes, or until the internal temperature reaches 165°F (75°C) in the thickest part of the thigh. Baste the chicken with the pan juices every 15 minutes for a golden-brown, crispy skin.
- Make the Green Sauce: While the chicken is roasting, prepare the green sauce. In a food processor or blender, combine the remaining cilantro, parsley, garlic, lime juice, and a pinch of salt. Slowly drizzle in the olive oil while the machine is running, blending until the sauce is smooth and creamy. Taste and adjust seasoning as needed.
- Rest and Serve: Once the chicken is cooked, transfer it to a cutting board and let it rest for 10-15 minutes. This resting period allows the juices to redistribute throughout the meat, ensuring a juicy, flavorful result. Carve the chicken and serve immediately, with the green sauce on the side for drizzling or dipping.
Timing Overview
• Brine time: 2-24 hours
• Cook time: 45-55 minutes
• Rest time: 10-15 minutes
• Total Time: 3-25 hours (including brining time)
Nutritional Information
Nutritional information is an estimate per serving, based on 6 servings.
• Protein: 46 g
• Sodium: 1230 mg
• Carbohydrates: 4 g
• Fat: 26 g
• Fiber: 1 g
🌱 Recipe Adaptations for Every Diet
• To Make it Vegan: To create a vegan version, substitute the chicken with a plant-based protein, such as extra-firm tofu or seitan. Adjust the brining and cooking times as needed, and use a vegan-friendly oil in the green sauce.
• To Add a Spicy Kick: For an extra pop of heat, add a finely chopped jalapeño or serrano pepper to the green sauce. You can also sprinkle a pinch of red pepper flakes over the chicken before roasting.
🥂 Perfect Pairings & Serving Suggestions
• Garnish Suggestions: Garnish the carved chicken with a sprinkle of chopped cilantro, a squeeze of fresh lime juice, and a drizzle of the vibrant green sauce.
• Beverage Pairing: This dish pairs beautifully with a crisp, dry white wine, such as a Sauvignon Blanc or Albariño. For a non-alcoholic option, a refreshing Peruvian-style limeade or iced tea would be a perfect accompaniment.
❗ Pro Tips for a Perfect Outcome Every Time
• Mistake 2 – Using Cold Ingredients: Bringing the chicken to room temperature before roasting is crucial for even cooking and a perfectly crisp skin. Make sure to remove the chicken from the refrigerator and allow it to sit at room temperature for 30 minutes before cooking.
• Mistake 3 – Not Preheating the Oven: Ensuring your oven is fully preheated to the correct temperature is essential for achieving a beautifully roasted chicken. If the oven is not hot enough, the chicken will steam rather than brown, resulting in a less crisp and flavorful end product.
📦 How to Keep Your Leftovers Fresh ?
• Freezing: The cooked chicken can be frozen for up to 3 months. Wrap the chicken tightly in plastic wrap or aluminum foil, then place in a resealable freezer bag. The green sauce can also be frozen for up to 3 months in an airtight container.
• Reheating: To reheat the chicken, preheat your oven to 350°F (175°C) and place the chicken on a baking sheet. Bake for 10-15 minutes, or until heated through. For the green sauce, simply thaw in the refrigerator overnight and give it a quick stir before serving.
❓ FAQs
Can I use boneless, skinless chicken breasts instead of a whole chicken?
While you can certainly use boneless, skinless chicken breasts in this recipe, the end result will not be quite the same. The skin and bone-in chicken are essential for achieving the perfect texture and flavor in this Peruvian-style dish. The skin gets wonderfully crisp, and the bone-in meat stays incredibly juicy and flavorful. If you opt for boneless, skinless breasts, the dish will likely be drier and less flavorful.
Is it necessary to brine the chicken?
Yes, brining the chicken is a crucial step in this recipe. The brine helps to season the meat all the way through, while also locking in moisture during the high-heat roasting process. Skipping the brining step will result in a less flavorful and potentially drier chicken. If you have the time, we highly recommend following the brining instructions for the best possible outcome.
Can I make the green sauce ahead of time?
Absolutely! The green sauce can be made a day in advance and stored in the refrigerator in an airtight container. This allows the flavors to meld and intensify, making the sauce even more delicious. When ready to serve, simply give the sauce a quick stir and you’re all set. Keep in mind that the color may darken slightly after sitting, but the flavor will still be just as vibrant.
What’s the best way to reheat leftover chicken?
For the best texture and crispiness, we recommend reheating the chicken in the oven. Preheat your oven to 350°F (175°C) and place the chicken on a baking sheet. Bake for 10-15 minutes, or until the chicken is heated through. Avoid reheating the chicken in the microwave, as this can cause the skin to become soggy.
Can I use dried herbs instead of fresh?
While fresh herbs are ideal for the most vibrant and authentic Peruvian flavor, you can certainly use dried herbs in a pinch. For the marinade, you can substitute 1 teaspoon of dried oregano and 1 teaspoon of dried parsley for the fresh herbs. Keep in mind that the flavor may not be as pronounced, and you may need to adjust the quantities to taste. For the green sauce, however, we highly recommend using fresh herbs for the best possible flavor.
🎉 Your Culinary Adventure Awaits!
Embrace the bold, tantalizing flavors of Peruvian cuisine and treat your taste buds to the ultimate chicken experience. This classic Peruvian chicken with green sauce is a true showstopper, guaranteed to impress your family and friends. So, gather your ingredients, fire up your oven, and get ready to embark on a culinary adventure that will transport you straight to the vibrant streets of Peru. Buen provecho!

Classic, Crowd-Pleasing Peruvian Chicken with Green Sauce
⏱️ Timing Overview
🥘 Ingredients
📝 Instructions
- In a large bowl, combine the kosher salt, garlic, cumin, paprika, oregano, and black pepper. Add the whole chicken and rub the seasoning mixture all over the skin and inside the cavity. Cover the bowl and refrigerate for at least 2 hours, or up to 24 hours. This brining process will ensure the chicken is seasoned all the way through and help lock in moisture during cooking.
- Preheat your oven to 425°F (220°C). Arrange the lemon slices and half of the cilantro and parsley in the bottom of a large roasting pan or baking dish. This will create a flavorful bed for the chicken to sit on.
- Remove the brined chicken from the refrigerator and place it breast-side up on the lemon and herb bed. Tuck the wing tips under the body and tie the legs together with kitchen string. Roast the chicken for 45-55 minutes, or until the internal temperature reaches 165°F (75°C) in the thickest part of the thigh. Baste the chicken with the pan juices every 15 minutes for a golden-brown, crispy skin.
- While the chicken is roasting, prepare the green sauce. In a food processor or blender, combine the remaining cilantro, parsley, garlic, lime juice, and a pinch of salt. Slowly drizzle in the olive oil while the machine is running, blending until the sauce is smooth and creamy. Taste and adjust seasoning as needed.
- Once the chicken is cooked, transfer it to a cutting board and let it rest for 10-15 minutes. This resting period allows the juices to redistribute throughout the meat, ensuring a juicy, flavorful result. Carve the chicken and serve immediately, with the green sauce on the side for drizzling or dipping.