If you’ve ever watched your dog zoom around the yard for two minutes… then come back inside and still act bored, you’re not alone. A dog playground backyard diy setup can turn “random yard time” into meaningful play, training, and enrichment—without needing fancy equipment or a huge budget. 🐾
The best part is that you can build it in layers. You’ll start with a simple layout your dog understands, then add obstacles that improve confidence, impulse control, and focus. Along the way, you’ll use positive reinforcement so your dog learns to love the space instead of feeling forced into it.
In this guide, you’ll learn how to plan a safe backyard play zone, build beginner-friendly DIY obstacles, and train your dog to use them calmly. You’ll also get troubleshooting tips for common issues like barking, fence-running, and “my dog won’t try the obstacle.”
💡 Why This Matters ?
A well-designed dog playground backyard diy area does more than “burn energy.” It gives your dog a predictable outlet for natural behaviors like sniffing, climbing, chasing, and problem-solving. That often shows up as fewer annoying habits indoors—less counter-surfing, less pacing, and fewer attention-barks.
It also helps you. When your backyard becomes a structured activity space, you can guide play instead of just supervising chaos. That means you get better recall, better leash manners, and more cooperation—because your dog practices listening while excited.
Expect a realistic timeline: many dogs show noticeable improvement in 7–14 days if you do short sessions 4–6 times per week. Puppies may need 2–4 weeks because attention spans are shorter, while adult dogs often progress faster once they understand the “game.” ✅
🎓 Section 1: Dog Playground Backyard DIY Planning & Safety
Before you build anything, plan your layout like you’re designing a mini training gym. Your goal is a flow that prevents collisions, avoids slippery surfaces, and gives your dog space to reset.
Start with surface and spacing. Grass is great, but mud isn’t. If your yard gets slick, use mulch, rubber mats, or outdoor turf in high-traffic lanes.
Key safety checks to do first:
- Walk the yard and remove sharp debris, toxic plants, and loose wires.
- Check fencing for gaps, wobbly boards, and “dig spots.”
- Avoid pressure-treated wood where your dog will chew.
- Keep obstacles at least 1.5–2 meters apart for medium/large dogs.
Equipment that makes DIY training easier (and safer):
- A flat buckle collar or harness for most dogs.
- A 3–5 meter long line for early sessions.
- High-value treats, plus a tug toy for reward variety.
- Non-slip outdoor tape for ramps and stepping surfaces.
Practical tips to set yourself up for success:
- Build “low and wide” first so your dog wins early.
- Add a calm zone (bed or mat) near the playground to practice settling.
- Keep early sessions short—3–8 minutes—so your dog ends eager, not fried.
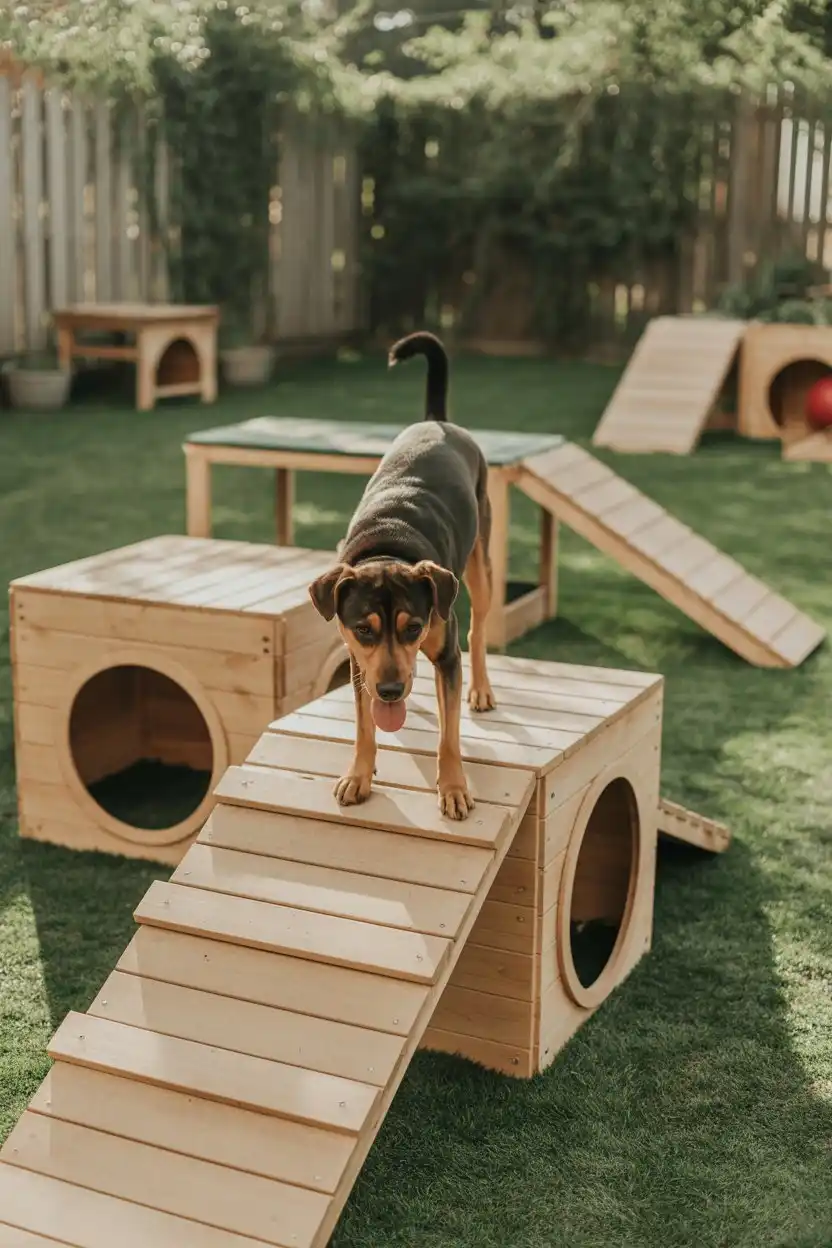
✅ Section 2: Build a Dog Playground Backyard DIY Course (Step-by-Step)
You don’t need perfection—you need sturdy, simple obstacles your dog can understand. Build in stages so your dog isn’t overwhelmed by a sudden backyard obstacle explosion.
- Create a simple loop
Pick a path your dog can follow: entry → sniff zone → obstacle → reward station → rest spot. This helps your dog predict what happens next. - Start with 3 beginner DIY obstacles
Use household-friendly materials first. - “Paws up” platform: a stable wooden board or low step.
- Cone weaves: plastic cones or upside-down buckets spaced wide.
- “Tunnel” option: a kids’ play tunnel or a large cardboard box line.
- Add one “confidence builder”
A very low balance beam (like a wide plank on bricks) builds body awareness.
Common mistakes to avoid:
- Making jumps too high too soon (especially risky for puppies).
- Using wobbly materials that scare your dog once, then create refusal.
- Luring nonstop without teaching the dog what earned the reward.
Training method (positive reinforcement):
- Mark the moment your dog succeeds with a consistent marker like
Yes!. - Reward at the end position (not back where they started).
- If your dog hesitates, reduce difficulty instead of repeating pressure.
🏆 Section 3: Train Skills, Add Challenges, Track Progress
Once your dog enjoys the space, turn it into real training that improves daily life. The secret is adding rules that keep arousal from turning into chaos.
Add 3 “life skills” games inside your DIY yard:
- Recall between obstacles: call once, reward big, then release back to play.
- “Wait” at the start line: one second at first, then build to 5–10.
- Settle on a mat after excitement: reward calm breathing and a soft body.
Real-world example: if your dog fence-runs, send them to a sniff station, then cue “paws up,” then reward a calm sit. You’re teaching an alternate pattern that works better than sprinting the perimeter.
Success indicators you’re on the right track:
- Your dog chooses the obstacles without being lured.
- Recovery is faster (less frantic after a zoom burst).
- Your dog can do a quick “sit” or “touch” even when excited.
Troubleshooting common issues:
- If your dog barks at the course, lower intensity and reward quiet seconds.
- If your dog grabs/chews equipment, offer a legal tug toy and reward disengaging.
- If your dog refuses an obstacle, shorten it, widen it, or reward “one paw” attempts.
Puppies vs adult dogs:
- Puppies should focus on confidence and variety, not height or repetitive impact.
- Adult dogs can handle more repetition, but still need warm-ups and rest breaks.
🎥 Video Resource Section
❓ Common Questions
Q: How big should a dog playground backyard diy area be? 🐕
A: Even 3×5 meters can work if you use a loop layout and rotate obstacles.
Q: Is DIY agility safe for puppies? ⚠️
A: Yes if you keep it low-impact—no high jumps, no steep A-frames, and short sessions.
Q: My dog gets too hyped and won’t listen—what now? ✅
A: Add calm breaks on a mat, reward quiet behavior, and keep sessions under 8 minutes.
Q: How fast will I see results? ⏱️
A: Many dogs improve focus in 1–2 weeks with consistent short sessions.
🎉 Conclusion & Next Steps
A dog playground backyard diy setup gives you more than a fun yard—it gives your dog a job, a routine, and a safe way to burn energy. 🐾 Start small, reward curiosity, and keep obstacles easy enough that your dog wins daily.
This week, build just 2–3 obstacles and practice one skill like “wait” or recall between stations. As your dog improves, increase challenge slowly (not height), and keep using positive reinforcement so the yard stays a happy place.
If you want faster progress, record one session to spot where timing or obstacle design needs tweaking. ✅