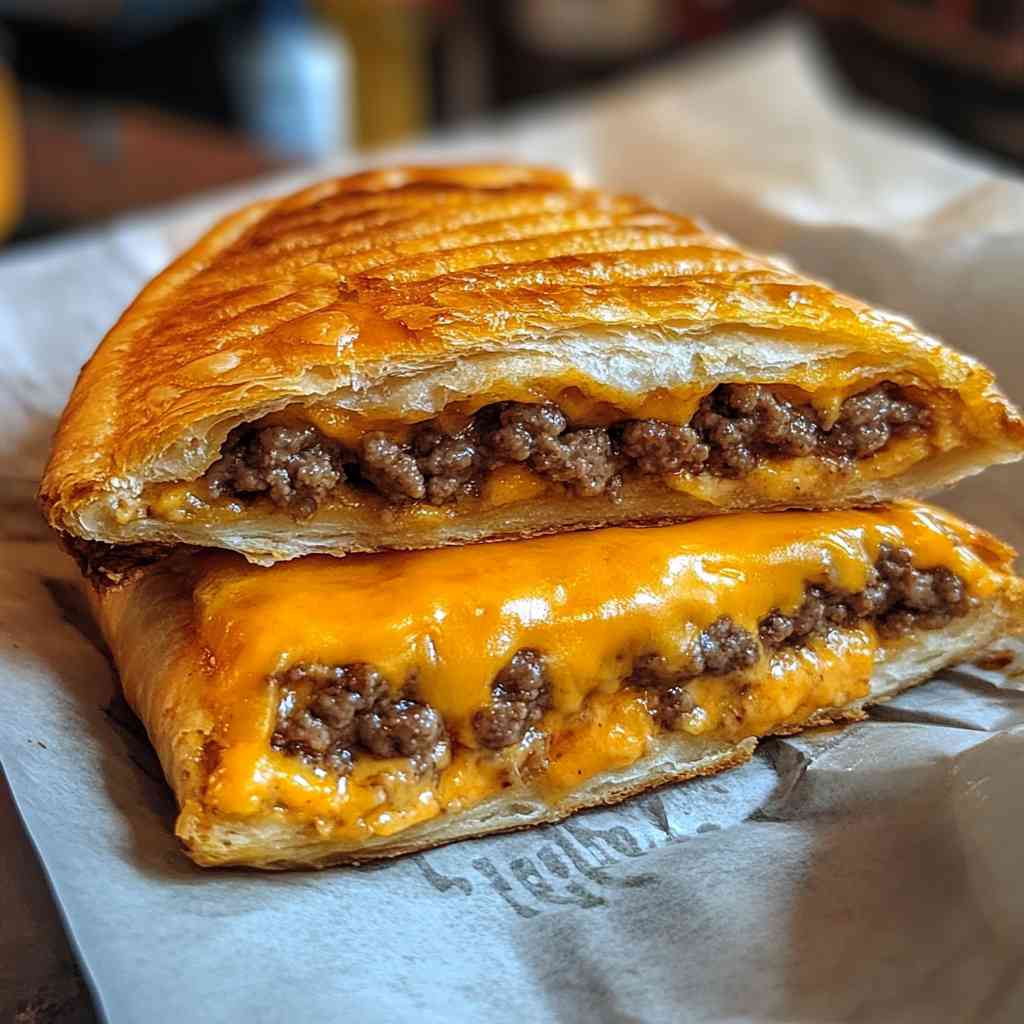
Biting into a warm, golden Cheeseburger Hot Pocket is the epitome of pure indulgence. Imagine the irresistible combination of savory beef, melted cheese, and tangy pickles, all wrapped in a flaky, buttery crust. This homemade version takes the classic convenience food to new heights, offering a hearty and satisfying meal that’s sure to become a family favorite.
What sets these Cheeseburger Hot Pockets apart is the attention to detail in both the filling and the dough. By carefully crafting each component, we’ve created a harmonious balance of flavors and textures that will have your taste buds dancing with joy. Get ready to experience the ultimate comfort food mashup that will have you craving more with every bite.
So, let’s dive in and explore the secrets to crafting the perfect Homemade Cheeseburger Hot Pockets that will elevate your snacking experience to new levels of deliciousness.
🌟 Reasons This Recipe Will Become a Favorite
These Cheeseburger Hot Pockets are not your average convenience food. They’re a culinary masterpiece that combines the irresistible flavors of a classic cheeseburger with the comforting texture of a flaky, golden pastry. The secret lies in the homemade dough, which is made with a blend of all-purpose flour and a touch of butter, creating a soft and tender crust that perfectly complements the savory filling.
But the real showstopper is the filling itself. We’ve carefully selected the right balance of ground beef, tangy pickles, and a blend of melty cheeses to deliver a flavor explosion in every bite. The result is a hearty, satisfying meal that will leave you craving more. Plus, the convenience of being able to bake these pockets straight from the freezer makes them the perfect go-to option for busy weeknights or weekend cravings.
Ingredients
• 1 teaspoon salt
• 1/2 cup (115g) unsalted butter, chilled and cubed
• 1/2 cup (120ml) ice-cold water
• 1 pound (450g) ground beef
• 1 onion, finely diced
• 2 cloves garlic, minced
• 1 teaspoon dried oregano
• 1 teaspoon paprika
• 1/2 teaspoon chili powder
• 1/2 teaspoon salt
• 1/4 teaspoon black pepper
• 1 cup (100g) shredded cheddar cheese
• 1/2 cup (80g) diced dill pickles
• 1 egg, beaten with 1 tablespoon water for egg wash
The key to this recipe is the perfect balance of savory flavors in the filling. The ground beef is seasoned with a blend of dried oregano, paprika, chili powder, salt, and pepper, creating a robust and complex taste that complements the melted cheddar cheese and tangy dill pickles. This combination of ingredients is what truly sets these Cheeseburger Hot Pockets apart from the store-bought version.
Instructions
- Make the Dough: In a large bowl, combine the all-purpose flour and salt. Add the chilled, cubed butter and use a pastry cutter or your fingers to work the butter into the flour until it resembles coarse crumbs. Slowly add the ice-cold water and mix just until the dough comes together. Shape the dough into a disk, wrap in plastic wrap, and refrigerate for at least 30 minutes.
- Prepare the Filling: In a large skillet over medium-high heat, cook the ground beef, onion, and garlic until the beef is browned and the onion is translucent, about 8-10 minutes. Drain any excess fat. Stir in the dried oregano, paprika, chili powder, salt, and black pepper. Remove from heat and let cool slightly.
- Assemble the Hot Pockets: Preheat your oven to 400°F (200°C). On a lightly floured surface, roll the dough out to a 1/4-inch thickness. Cut the dough into 8 equal rectangles. Place a heaping 1/4 cup of the beef filling onto the center of 4 of the rectangles, leaving a 1-inch border. Top the filling with shredded cheddar cheese and diced pickles. Brush the exposed dough edges with the egg wash. Place the remaining 4 dough rectangles on top and use a fork to crimp and seal the edges. Transfer the assembled hot pockets to a parchment-lined baking sheet.
- Bake the Hot Pockets: Brush the tops of the hot pockets with the remaining egg wash. Bake for 20-25 minutes, or until the crust is golden brown and flaky. Allow the hot pockets to cool for 5 minutes before serving.
Timing Overview
• Cook time: 20-25 minutes
• Chill time: 30 minutes
• Baking time: 20-25 minutes
• Total Time: 1 hour 45 minutes
Nutritional Information
Nutritional information is an estimate per serving, based on 8 servings.
• Protein: 23 g
• Sodium: 810 mg
• Carbohydrates: 33 g
• Fat: 24 g
• Fiber: 2 g
🔄 Creative Twists & Variations
• To Make it Vegan: Replace the ground beef with crumbled firm tofu or plant-based ground meat substitute. Use a dairy-free cheese shreds and brush the pastry with a plant-based milk or olive oil instead of the egg wash.
• To Add a Spicy Kick: Mix in a tablespoon of your favorite hot sauce or diced jalapeños into the beef filling for a fiery twist. You can also sprinkle a pinch of cayenne pepper or crushed red pepper flakes over the filling before sealing the pockets.
🍽️ Plating and Presentation Tips
• Garnish Suggestions: Garnish the hot pockets with a sprinkle of chopped fresh parsley or chives, a drizzle of tangy barbecue sauce, or a dollop of cool sour cream.
• Beverage Pairing: This dish pairs wonderfully with a crisp lager or a refreshing iced tea for a classic cheeseburger-inspired pairing.
❗ Pro Tips for a Perfect Outcome Every Time
• Mistake 2 – Using Cold Ingredients: Make sure all the ingredients, especially the butter for the dough, are at room temperature before starting. Cold ingredients can make the dough tough and difficult to work with, affecting the final texture of the hot pockets.
• Mistake 3 – Not Preheating the Oven: Properly preheating the oven is crucial for achieving a golden, flaky crust on the hot pockets. If the oven is not hot enough, the dough may not rise and bake correctly, leading to a soggy or undercooked result.
📦 How to Keep Your Leftovers Fresh ?
• Freezing: These hot pockets can be frozen for up to 3 months. Wrap each pocket individually in plastic wrap or aluminum foil, then place them in a resealable freezer bag. To reheat, bake the frozen hot pockets directly from the freezer at 350°F (175°C) for 20-25 minutes, or until heated through and the crust is golden brown.
• Reheating: For the best texture, reheat the hot pockets in the oven at 350°F (175°C) for 10-15 minutes, or until heated through. Avoid microwaving, as it can make the crust soggy.
❓ FAQs
Can I use a different type of cheese in the filling?
Absolutely! While cheddar cheese is the traditional choice, you can experiment with other melty cheese varieties like American, Swiss, or Monterey Jack. Just be sure to use the same amount (1 cup) of shredded cheese for the best results.
How can I make the dough ahead of time?
The dough for these Cheeseburger Hot Pockets can be made in advance and stored in the refrigerator for up to 3 days. Simply shape the dough into a disk, wrap it in plastic wrap, and refrigerate until ready to use. When you’re ready to assemble the hot pockets, allow the dough to come to room temperature for 30 minutes before rolling it out.
Can I bake the hot pockets directly from frozen?
Yes, you can! If you’ve prepared a batch of hot pockets and want to freeze them for later, you can bake them straight from the freezer. Simply preheat your oven to 400°F (200°C) and bake the frozen hot pockets for 25-30 minutes, or until the crust is golden brown and flaky.
How can I make the filling extra flavorful?
For an even more robust flavor, try browning the ground beef with a bit of Worcestershire sauce or soy sauce. You can also experiment with different spice blends, such as adding a teaspoon of garlic powder, onion powder, or smoked paprika to the filling.
Can I make the hot pockets in advance and reheat them later?
Absolutely! These Cheeseburger Hot Pockets are perfect for meal prep. After assembling the pockets, you can either bake them right away or freeze them for later. When ready to serve, simply reheat the baked hot pockets in the oven at 350°F (175°C) for 10-15 minutes, or until heated through.
🎉 Your Culinary Adventure Awaits!
Get ready to embark on a delicious journey with these Homemade Cheeseburger Hot Pockets. From the flaky, buttery crust to the savory, melty filling, every bite is a testament to the power of homemade comfort food. Whether you’re serving them as a quick weeknight meal, a satisfying snack, or a crowd-pleasing appetizer, these hot pockets are sure to become a new family favorite.
So, gather your ingredients, preheat your oven, and get ready to savor the ultimate cheeseburger experience, all wrapped up in a perfectly portable package.
Bon appétit, and enjoy your culinary adventure!

Homemade, Hearty Cheeseburger Hot Pockets
⏱️ Timing Overview
🥘 Ingredients
📝 Instructions
- In a large bowl, combine the all-purpose flour and salt. Add the chilled, cubed butter and use a pastry cutter or your fingers to work the butter into the flour until it resembles coarse crumbs. Slowly add the ice-cold water and mix just until the dough comes together. Shape the dough into a disk, wrap in plastic wrap, and refrigerate for at least 30 minutes.
- In a large skillet over medium-high heat, cook the ground beef, onion, and garlic until the beef is browned and the onion is translucent, about 8-10 minutes. Drain any excess fat. Stir in the dried oregano, paprika, chili powder, salt, and black pepper. Remove from heat and let cool slightly.
- Preheat your oven to 400°F (200°C). On a lightly floured surface, roll the dough out to a 1/4-inch thickness. Cut the dough into 8 equal rectangles. Place a heaping 1/4 cup of the beef filling onto the center of 4 of the rectangles, leaving a 1-inch border. Top the filling with shredded cheddar cheese and diced pickles. Brush the exposed dough edges with the egg wash. Place the remaining 4 dough rectangles on top and use a fork to crimp and seal the edges. Transfer the assembled hot pockets to a parchment-lined baking sheet.
- Brush the tops of the hot pockets with the remaining egg wash. Bake for 20-25 minutes, or until the crust is golden brown and flaky. Allow the hot pockets to cool for 5 minutes before serving.