When the temperatures start to rise and the sun blazes overhead, nothing beats the sensation of a cold, sweet treat melting in your mouth. While ice cream and popsicles are staples of the summer season, there is a unique charm to “ice candy.” Popular in many tropical regions, particularly the Philippines, ice candy is a frozen delight packed in small plastic tubes. Among the myriad of flavors available from chocolate to avocado the fruit salad ice candy recipe stands out as a crowd favorite.
This dessert is essentially a frozen version of the classic creamy fruit salad. It combines the rich, velvety texture of milk and cream with the refreshing burst of fruit cocktail. It is not just a way to cool down; it is a nostalgic trip down memory lane for many adults and an exciting, colorful snack for children.
Whether you are looking to start a small home business or simply want to stock your freezer with homemade goodies, this recipe is perfect for you.
What Makes This Recipe So Good
The beauty of the fruit salad ice candy lies in its simplicity and its texture. Unlike water-based popsicles that freeze into hard blocks of ice, this recipe utilizes a milky base. By incorporating ingredients like cornstarch or cassava flour dissolved in water (a slurry), the mixture achieves a texture similar to gelato or soft-serve ice cream once frozen. It bites easily rather than crumbling into shards of ice.
Furthermore, this recipe is incredibly versatile. It allows you to use pantry staples like canned fruit cocktail, condensed milk, and evaporated milk. It is a brilliant way to stretch a small can of fruit into dozens of treats, making it highly economical. The visual appeal is also undeniable; the colorful bits of papaya, pineapple, cherries, and nata de coco suspended in white milk look festive and appetizing.
Shopping List
Before you start cooking, ensure you have all the necessary ingredients and tools. This recipe focuses on achieving that creamy, “special” texture rather than a watery one. Here is what you will need:
- 1 can (836g) Fruit Cocktail: Drain the syrup, but reserve it if you want extra sweetness.
- 1 can (390g) Condensed Milk: This provides the primary sweetness and creaminess.
- 1 can (370ml) Evaporated Milk: Adds a rich milky flavor.
- 1 pack (250ml) All-Purpose Cream: For that extra velvety texture.
- 3.5 liters Water: Used as the base liquid.
- 2 cups Granulated Sugar: Adjust according to your taste, remembering that frozen items taste less sweet than room-temperature items.
- 3/4 cup Cornstarch: This is the secret ingredient for smooth texture.
- 1/2 teaspoon Vanilla Extract: Enhances the flavor profile.
- Ice Candy Bags (size 1.5 x 10): The standard size for this treat.
- A funnel: Essential for pouring the mixture into the bags without making a mess.
How to Make It
Making fruit salad ice candy is a two-part process: cooking the base and then packing it. Cooking the base is crucial because it activates the cornstarch, which prevents large ice crystals from forming.
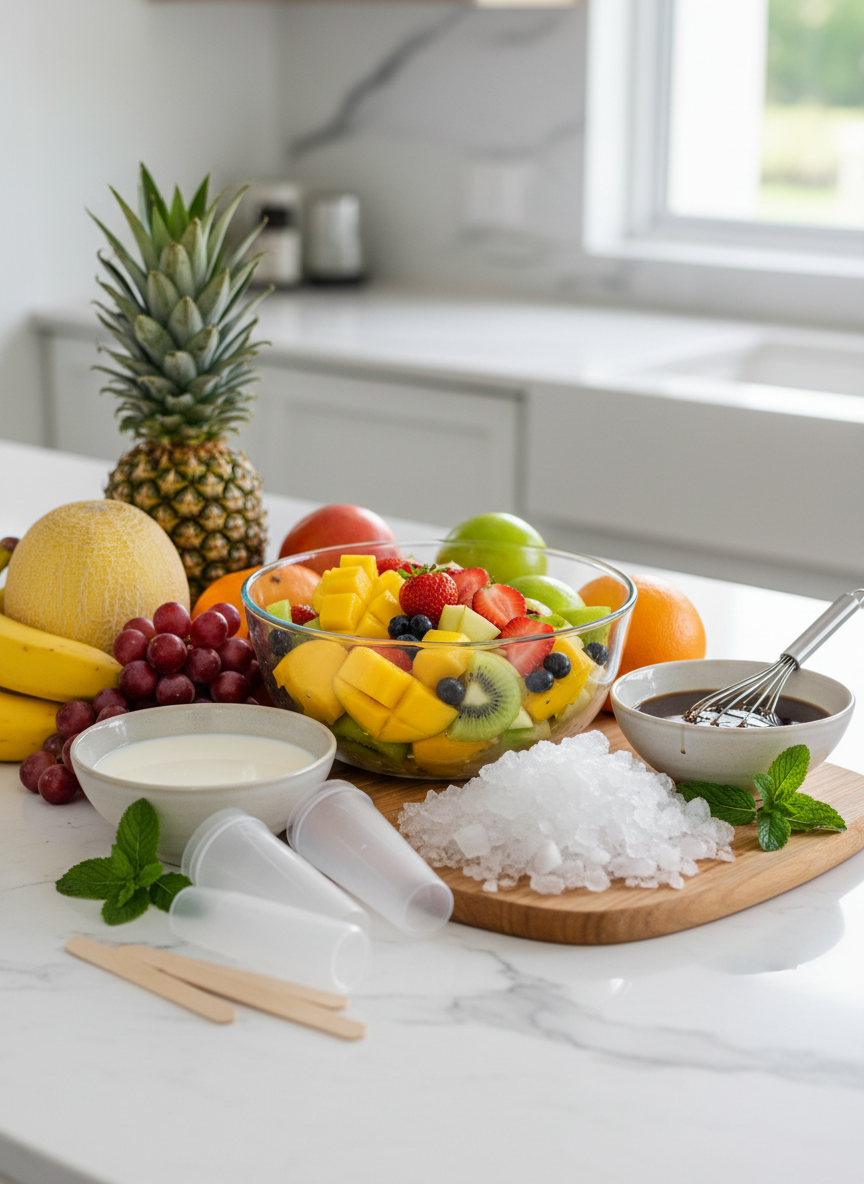
- Prepare the Fruit: Open your can of fruit cocktail and drain the syrup thoroughly. If the chunks of fruit are too large, chop them into smaller, bite-sized pieces. This ensures that every bite of the ice candy has a bit of fruit in it and makes it easier to funnel into the narrow bags.
- Dissolve the Cornstarch: In a small bowl, mix the 3/4 cup of cornstarch with about 1 cup of water (taken from the 3.5 liters). Whisk until it is completely smooth and free of lumps. Set this slurry aside.
- Boil the Water: Pour the remaining water into a large pot and bring it to a rolling boil over medium-high heat.
- Add Sugar and Slurry: Once the water is boiling, add the sugar and stir until dissolved. Lower the heat to medium. Slowly pour in the cornstarch slurry while whisking continuously. The liquid will start to thicken slightly. Simmer for about 3 to 5 minutes to cook off the raw flour taste.
- Add the Milks: Turn off the heat. While the mixture is still hot, pour in the condensed milk, evaporated milk, and all-purpose cream. Stir vigorously to combine. Adding the milks after turning off the heat preserves their flavor and prevents curdling. Stir in the vanilla extract.
- Cool Down: Allow the milky mixture to cool down completely to room temperature. This is important; if you pack it hot, the plastic bags might melt or leach chemicals.
- Add the Fruit: Once the liquid base is cool, mix in the drained fruit cocktail.
- Pack the Ice Candy: Using a funnel, pour the mixture into the ice candy wrappers. A good tip is to stir the main pot frequently so the fruit pieces don’t settle at the bottom, ensuring equal fruit distribution in every bag. Leave about 1.5 to 2 inches of empty space at the top of the bag to twist and tie a knot.
- Freeze: Lay the ice candies flat in the freezer. Freeze overnight or until completely solid.
Must-Have Kitchen Tools
Product | Product Name | Rating | Check Price |

| Air Fryer (Oil-Free Healthy Cooker) | ; | |

| Chef’s Knife (8-Inch Professional Kitchen Knife) | ; | |

| Stand Mixer (Multi-Function Baking Mixer) | ; | |

| Nonstick Frying Pan (Premium Skillet) | ; | |

| Digital Kitchen Scale (Precise Food Scale) | ; | |

| Blender (High-Speed Smoothie & Sauce Blender) | ; | |

| Measuring Cups & Spoons Set (Stainless Steel) | ; |
Keeping It Fresh
While ice candy is a frozen product, it does not last forever. Ideally, you should consume these treats within **two to three weeks. Beyond this point, even with the cornstarch base, they may succumb to freezer burn, developing an icy layer on the outside of the plastic that affects the flavor.
To keep them tasting their best, try to store them in a dedicated section of your freezer away from raw meats or fish. Plastic is porous, and strong odors from fish can sometimes permeate the ice candy bags, leading to an unpleasant savory aftertaste in your dessert.
If you are making a large batch, you can group 10 pieces together and place them inside a larger Ziploc bag for an extra layer of protection.
Related Recipes :
Creamy Old Fashioned Macaroni Salad With Tuna
Simple Egg Salad Recipe No Mustard: Creamy and Classic
Creamy Sweet Kale Salad Dressing Recipe
Health Benefits
While fruit salad ice candy is primarily a dessert and should be enjoyed in moderation, it does offer some nutritional benefits compared to soda or artificially flavored hard candies.
First, it contains calcium and Vitamin D from the combination of evaporated milk and all-purpose cream. These are essential for bone health. Second, unlike popsicles made purely of sugar water and dye, this recipe includes real fruit. The fruit cocktail provides small amounts of dietary fiber, Vitamin C, and antioxidants.
However, be mindful of the sugar content. If you are diabetic or watching your caloric intake, you can modify the recipe by using low-fat milk options and sugar substitutes like stevia or erythritol, though this may slightly alter the texture.
Common Mistakes to Avoid
Even though this is an easy recipe, a few common errors can ruin the batch.
One major mistake is overfilling the bags. Remember that liquids expand when they freeze. If you fill the plastic tube to the very brim, it will likely burst or leak during the freezing process. Always leave enough headspace.
Another issue is undercooking the starch. If you do not let the cornstarch slurry boil for a few minutes, the ice candy will have a powdery, chalky aftertaste. Ensure the mixture bubbles gently before turning off the heat.
Finally, avoid skipping the cooling process. Pouring hot liquid into thin polyethylene bags is dangerous and can cause the plastic to warp or release toxins. Patience is key; wait until the mixture is at room temperature before packing.
Recipe Variations
Once you have mastered the basic fruit salad ice candy recipe, you can get creative with variations to suit your taste buds.
* Buko Salad Ice Candy: Add shredded young coconut (buko) and strips of pandan gelatin to the mixture. You can also replace half of the water with coconut water for a more tropical flavor.
* Ube-Cheese: Add ube (purple yam) flavoring or halaya to the milk base and drop small cubes of cheddar cheese into the bags before filling. The salty-sweet combination is addictive.
* Yogurt-Based: For a healthier, tangier version, replace the all-purpose cream with plain or Greek yogurt. This creates a flavor profile similar to frozen yogurt pops.
* Fresh Fruit Version: If you prefer not to use canned fruit, you can use fresh mangoes, strawberries, or melon. Just remember that fresh fruit has a higher water content and shorter shelf life than preserved fruit.
FAQs
Why is my ice candy hard and not creamy?
This usually happens if there is too much water and not enough binders (milk, cream, or cornstarch). Do not skip the cornstarch slurry step, as this acts as a stabilizer. Also, ensure you are using full-fat milk ingredients for the best texture.
How do I tie the ice candy bags easily?
Tying the knot can be tricky for beginners. Hold the filled part of the bag firmly with one hand. Twist the empty top part tightly to create a “rope.” Wrap this twisted part around your thumb, tuck the end through the loop created, and pull tight. It takes practice!
Can I use coconut milk instead of evaporated milk?
Yes! Coconut milk creates a richer, more distinct flavor profile (Ginataang style). However, coconut milk spoils faster than dairy milk, so ensure you freeze the ice candy immediately after packing and consume it within a week.
Is it necessary to boil the water?
Yes. Boiling the water is required to activate the cornstarch (which thickens the mixture) and to ensure the sugar is completely dissolved. It also sanitizes the water, which is important for food safety.
Final Thoughts
The fruit salad ice candy recipe is more than just a set of instructions; it is a ticket to a refreshing, sweet escape. It combines the wholesome goodness of milk with the vibrant taste of fruit, resulting in a treat that appeals to all ages. Whether you are making this for a family gathering, a children’s party, or just to have something sweet after dinner, the effort is well worth it.
By following the tips on texture and avoiding common mistakes, you can create professional-quality ice candy right in your own kitchen. So, grab your funnel, mix up a batch, and enjoy the cool, creamy satisfaction of homemade fruit salad ice candy. Don’t forget to share a few pieces with your neighbors it’s a great way to spread a little summer joy!