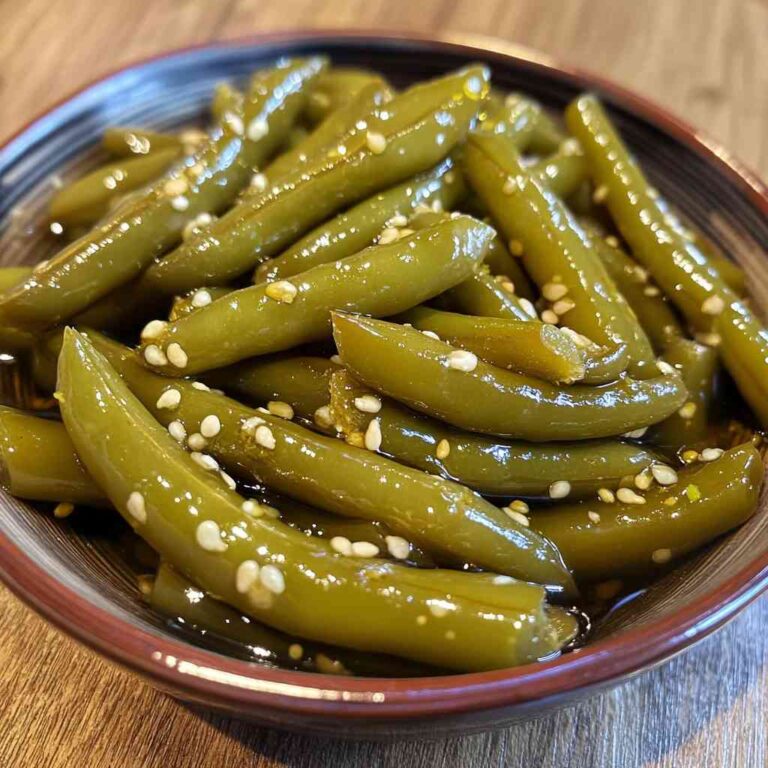
Freezing green beans is one of the best ways to preserve fresh garden harvest or store-bought beans for year-round enjoyment. When done correctly, frozen green beans maintain their vibrant color, crisp texture, and nutritional value for up to 12 months.
This guide walks you through the proper blanching and freezing process that ensures your beans taste garden-fresh even months later. Whether you’re dealing with a bumper crop or simply want to stock your freezer, this method delivers restaurant-quality results.
The process involves cleaning, trimming, blanching, cooling, and freezing the beans in a specific way that prevents freezer burn and preserves quality. While it takes a bit of time upfront, the reward is having delicious green beans ready whenever you need them for casseroles, stir-fries, or simple side dishes.
💚 Why Proper Freezing Makes All the Difference ?
Freezing green beans correctly transforms how you use and enjoy vegetables throughout the year. First, blanching before freezing stops enzyme action that causes loss of flavor, color, and texture. Without blanching, frozen beans turn brown, mushy, and develop off-flavors within weeks. Properly blanched beans stay bright green and crisp-tender for an entire year.
Second, home-frozen beans taste significantly better than most store-bought frozen varieties because you control freshness and quality. You freeze beans at their peak ripeness rather than commercial beans that may sit for days before processing.
Third, freezing your own beans saves money, especially during peak season when fresh beans are abundant and affordable. Finally, having frozen green beans on hand makes meal planning effortless they’re already prepped and ready to cook straight from the freezer.
🥘 What You’ll Need ?
- Fresh green beans (any amount you want to freeze)
- Large pot of boiling water
- Large bowl of ice water
- Slotted spoon or spider strainer
- Clean kitchen towels or paper towels
- Freezer bags or airtight containers
- Permanent marker for labeling
- Colander for draining
🔪 How to Freeze Green Beans Properly Step-by-Step ?
Step 1: Select and Wash Your Green Beans
Choose fresh, crisp green beans without blemishes, soft spots, or yellowing. Younger, tender beans freeze better than large, tough ones. Rinse beans thoroughly under cold running water to remove dirt, debris, and any garden residue. Place clean beans in a colander and shake gently to remove excess water.
Step 2: Trim the Ends
Line up several beans on a cutting board. Use a sharp knife to slice off the stem ends where beans attached to the plant. Some people also remove the pointed tail ends, though this is optional as they’re edible. You can snap ends off by hand if you prefer, though cutting creates more uniform pieces. For even cooking and freezing, cut longer beans into 2-inch pieces.
Step 3: Prepare Your Blanching Setup
Fill a large pot three-quarters full with water and bring to a rolling boil over high heat. While water heats, prepare an ice bath by filling a large bowl with cold water and plenty of ice cubes. The ice bath must be big enough to hold all your beans with room to stir. Set up your workspace with the boiling pot, ice bath, slotted spoon, and clean towels nearby for efficient workflow.
Step 4: Blanch the Green Beans
Working in batches of about 1 pound at a time, carefully lower trimmed beans into boiling water. Start timing immediately—blanch small beans for 2 minutes, medium beans for 3 minutes, and large beans for 4 minutes. The water should return to boiling within 1 minute. If it doesn’t, you’ve added too many beans at once. Boiling must continue during the entire blanching time.
Step 5: Shock in Ice Water
As soon as the timer goes off, immediately lift beans from boiling water using a slotted spoon or spider strainer. Plunge them directly into the prepared ice bath. Stir beans around in the ice water to cool them quickly and evenly. Beans should stay in ice water for the same amount of time they were blanched—2 to 4 minutes depending on size. This stops the cooking process completely.
Step 6: Drain and Dry Thoroughly
Remove cooled beans from ice water and place in a colander. Shake colander vigorously to remove as much water as possible. Spread beans in a single layer on clean kitchen towels or several layers of paper towels. Pat them dry thoroughly. Excess moisture causes ice crystals and freezer burn, so this drying step is crucial for long-term quality.
Step 7: Flash Freeze for Best Results
For individually frozen beans that don’t clump together, arrange dried beans in a single layer on a baking sheet lined with parchment paper. Make sure beans don’t touch each other. Place baking sheet in freezer for 1 to 2 hours until beans are frozen solid. This flash-freezing step is optional but highly recommended—it prevents beans from freezing into one solid block.
Step 8: Package for Long-Term Storage
Transfer flash-frozen beans into freezer bags or airtight containers. Remove as much air as possible from bags by pressing gently or using a straw to suck out air before sealing. Leave half-inch headspace in rigid containers to allow for expansion. Label each package with contents and date using a permanent marker. Stack flat bags in freezer for space-efficient storage.
🎨 Freezing Methods and Variations
- Without Blanching Method: Raw green beans can be frozen without blanching, but quality deteriorates rapidly. Use within 2 months and expect softer texture and faded color. Good for beans destined for soups or stews where texture matters less.
- Seasoned Beans: Toss blanched, dried beans with olive oil, garlic, salt, and pepper before freezing for ready-to-roast vegetables. Spread on baking sheet, freeze solid, then package.
- Steam Blanching: Instead of boiling water, steam beans over boiling water for 3 to 4 minutes. This preserves slightly more nutrients but takes longer and handles smaller batches.
- Portion Control: Freeze beans in meal-sized portions matching your typical recipes—1 cup, 2 cups, or 1 pound packages make cooking easier later.
📝 Critical Freezing Tips
Use youngest, freshest beans for best results. Blanching time is crucial underblanching fails to stop enzymes, overblanching makes mushy beans. Keep ice water cold by adding more ice as it melts.
Work in small batches for consistent results. Remove all air from storage bags to prevent freezer burn. Freeze at 0°F or below for optimal preservation.
Use frozen beans within 12 months for peak quality, though they remain safe indefinitely if frozen properly.
🍽️ How to Use Frozen Green Beans ?
Cook frozen beans directly from freezer without thawing thawing creates mushiness. For steaming, cook 5 to 7 minutes. For boiling, add to boiling water and cook 3 to 5 minutes. For sautéing, add frozen beans to hot pan with butter or oil and cook 8 to 10 minutes. For roasting, spread frozen beans on baking sheet, drizzle with oil, and roast at 425°F for 20 to 25 minutes.
Frozen beans work perfectly in green bean casserole, stir-fries, soups, stews, and pasta dishes. They’re already blanched, so cooking times are shorter than fresh beans. Season generously since freezing can dull flavors slightly.
⏱️ Time Investment
- Prep and Trimming: 10 minutes per pound
- Blanching Time: 2 to 4 minutes per batch
- Cooling Time: 2 to 4 minutes per batch
- Drying and Packaging: 10 minutes
- Total Time: Approximately 30 to 45 minutes per 3 pounds
❓ Common Freezing Questions
Can I freeze green beans without blanching?
Yes, but quality declines rapidly. Blanched beans maintain color, texture, and flavor for 12 months versus 2 months unblanched.
Why did my frozen beans turn brown?
Insufficient blanching time allowed enzymes to remain active. Always blanch the full recommended time and cool immediately in ice water.
How long do frozen green beans last?
Properly blanched and packaged beans maintain best quality for 12 months. They remain safe beyond this but may develop off-flavors or textures.
Do I need to thaw before cooking?
No, cook directly from frozen. Thawing creates excess moisture and mushy texture.
Can I refreeze thawed green beans?
Only if they were thawed in the refrigerator and still cold. Quality decreases with each freeze-thaw cycle.
What’s the white stuff on my frozen beans?
Freezer burn from air exposure. Beans are still safe but affected areas may be tough and flavorless. Prevent by removing all air from packages.
🎉 Conclusion
Freezing green beans properly preserves garden freshness for months of delicious meals. Blanching is the crucial step that maintains color, texture, and nutrients. With proper technique and packaging, your frozen beans rival fresh quality.
Stock your freezer during peak season and enjoy homegrown taste all year long