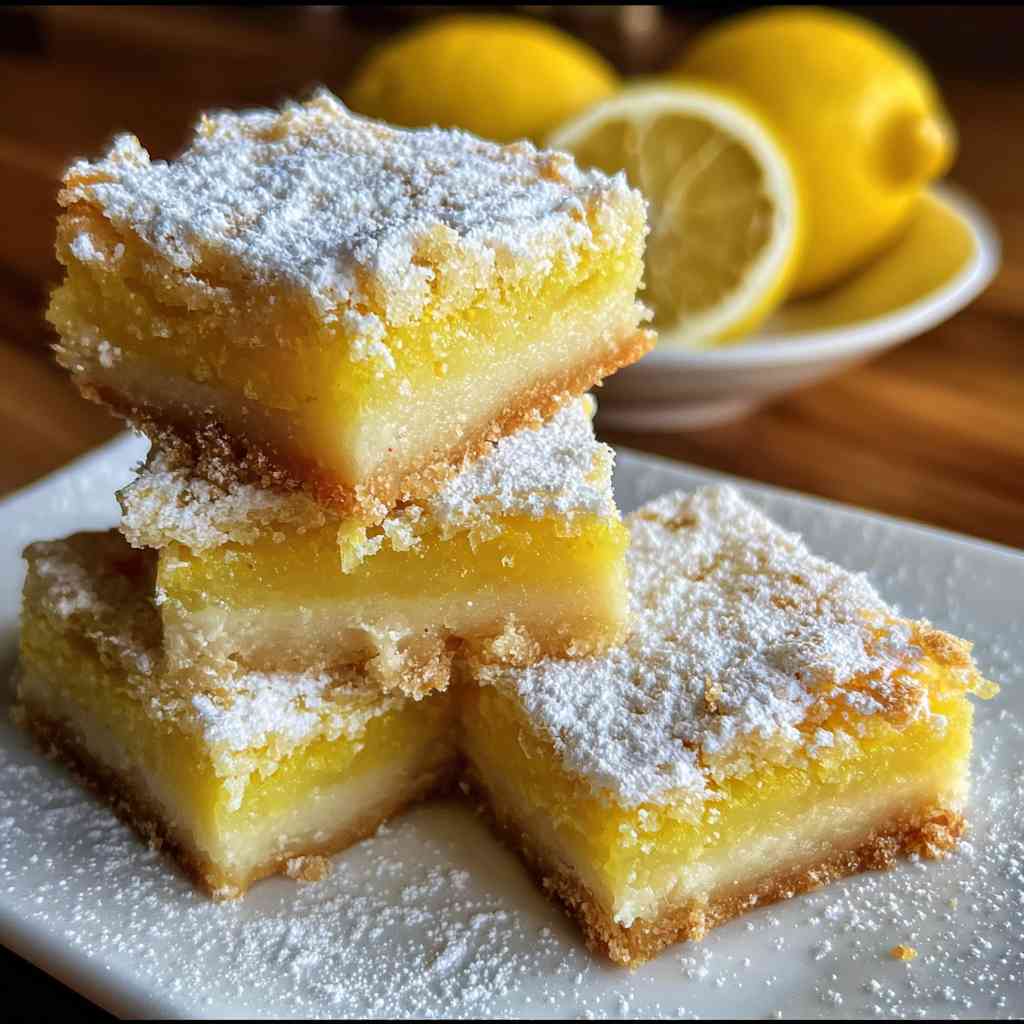
If there’s one dessert that perfectly captures the brightness of summer and the comfort of homemade baking, it’s Lemon Bars. These tangy, buttery squares are the ultimate blend of sweet and sour, offering a refreshing citrus bite with every mouthful. Whether you’re hosting a brunch, planning a picnic, or simply craving a zesty treat with your afternoon tea, this Lemon Bars Recipe will quickly become a favorite in your dessert collection.
What makes lemon bars irresistible is their contrast of textures a buttery shortbread crust supporting a smooth, vibrant lemon filling dusted with powdered sugar. It’s a combination that’s both elegant and comforting.
This recipe is designed for both beginners and seasoned bakers. You’ll learn not just how to bake perfect lemon bars, but also how to achieve the ideal balance of tartness and sweetness, keep the crust crisp, and prevent soggy bottoms.
So, get your lemons ready, preheat your oven, and let’s make a pan of sunshine! 🌞
💛 Why You’ll Love This Lemon Bars Recipe ?
There are dozens of lemon bar recipes out there, but this one stands out for several reasons:
- Perfectly Balanced Flavor: Tangy lemon juice meets just the right amount of sugar for that refreshing zing without being too sour.
- Melt-in-Your-Mouth Texture: The buttery crust is crumbly yet firm, holding the smooth, custard-like lemon layer perfectly.
- Simple Ingredients, Big Flavor: You don’t need fancy ingredients — just lemons, eggs, butter, sugar, and flour.
- Versatile for Any Occasion: From casual family desserts to elegant gatherings, lemon bars always impress.
- Freezer-Friendly: You can make them ahead and freeze for a quick, refreshing dessert anytime.
Every bite tastes like sunshine in dessert form — tangy, bright, and completely satisfying.
🧂 What You’ll Need to Prepare Lemon Bars ?
Here’s everything you’ll need to create the best homemade lemon bars.
| Ingredient | Quantity | Purpose |
|---|---|---|
| All-purpose flour | 2 cups (divided) | For crust and filling thickening |
| Unsalted butter, melted | 1 cup (2 sticks) | Creates a rich, buttery crust |
| Granulated sugar | 1 cup (for crust) + 1 ½ cups (for filling) | Sweetens both layers |
| Large eggs | 4 | For creamy, custard-like lemon layer |
| Fresh lemon juice | ¾ cup (about 4 lemons) | Adds tangy, bright flavor |
| Lemon zest | 1 tablespoon | Enhances lemon aroma |
| Baking powder | ½ teaspoon | Slight lift for filling texture |
| Salt | ¼ teaspoon | Balances sweetness |
| Powdered sugar | For dusting | Finishing touch and presentation |
Tip: Always use fresh lemon juice — bottled juice just doesn’t compare in flavor or freshness.
👩🍳 How to Make Lemon Bars – Step-by-Step Instructions ?
Step 1: Preheat the Oven and Prepare Your Pan
Preheat your oven to 350°F (175°C). Line a 9×13-inch baking dish with parchment paper, leaving some overhang on the sides. This makes it easier to lift out the bars later for clean slicing.
Step 2: Make the Buttery Crust
In a large mixing bowl, combine 2 cups of flour, 1 cup of granulated sugar, and 1 cup of melted butter. Mix until a crumbly dough forms.
Press the dough evenly into the bottom of the prepared baking dish.
Use your fingertips or the bottom of a measuring cup to press it flat and even. This ensures your crust bakes uniformly.
Bake for 15–18 minutes, or until lightly golden around the edges.
Step 3: Prepare the Lemon Filling
While the crust is baking, whisk together the eggs, 1 ½ cups sugar, ¾ cup lemon juice, 1 tablespoon lemon zest, ½ teaspoon baking powder, and ¼ teaspoon salt in a medium bowl.
Then sift in ¼ cup of flour and whisk until smooth and lump-free.
This will create a silky lemon mixture that bakes into a smooth custard layer.
Step 4: Pour and Bake
Once the crust is golden, remove it from the oven. Pour the lemon mixture directly over the hot crust.
Return the pan to the oven and bake for 22–25 minutes, or until the filling is set but still slightly jiggles in the center.
Avoid overbaking — the filling continues to set as it cools.
Step 5: Cool and Dust
Allow the bars to cool completely in the pan, then refrigerate for at least 2 hours before slicing.
Once chilled, lift the bars out using the parchment paper overhang and cut into squares.
Dust generously with powdered sugar right before serving.
And there you have it — perfect, bakery-style Lemon Bars! 🍋
🌈 Variations
Lemon bars are versatile and open to creative twists. You can adjust them to your taste or experiment with fun flavor combinations:
- Lime Bars: Substitute lemon juice with fresh lime juice for a tropical twist.
- Orange Lemon Bars: Use a mix of orange and lemon juice for a milder, sweeter citrus flavor.
- Berry Swirl Lemon Bars: Add a spoonful of raspberry or blueberry puree to the filling before baking for color and fruity depth.
- Coconut Lemon Bars: Mix shredded coconut into the crust for a chewy tropical texture.
- Gluten-Free Lemon Bars: Replace regular flour with almond flour or gluten-free all-purpose mix.
- Meyer Lemon Bars: These sweeter lemons make a less tart, more fragrant version.
You can also experiment with toppings — try toasted coconut flakes, candied lemon peel, or white chocolate drizzle for a gourmet touch.
Each variation brings its own unique charm, making lemon bars a dessert that never gets boring.
🔥 Cooking Note
The key to perfect lemon bars lies in balance and timing. The crust must be baked until just golden to prevent sogginess when the filling is poured. Avoid underbaking the crust — it should be firm enough to hold the filling but still tender.
When baking the lemon filling, avoid overcooking; otherwise, it may crack or lose its creamy texture. The ideal bake leaves the center slightly wobbly — it will firm up as it cools.
Always cool your bars completely before cutting. Warm lemon bars tend to break apart, while chilled bars hold shape beautifully and have a cleaner finish.
Another pro tip: dust powdered sugar just before serving, not before refrigerating, as the moisture from the fridge can cause it to dissolve.
Lastly, for sharp, bakery-style edges, use a hot, clean knife for each slice. Dip it in warm water, wipe, and repeat after each cut.
These little details turn a good lemon bar into an extraordinary one!
🍽️ Serving Suggestions
Lemon bars are wonderful served chilled or at room temperature. They’re the perfect dessert for:
- Tea Parties: Pair with Earl Grey or chamomile tea for an elegant afternoon treat.
- Brunch Buffets: Add alongside muffins, croissants, and fruit platters.
- Summer Picnics: Refreshing, portable, and mess-free.
- Holiday Desserts: Add color and contrast to a cookie tray or festive dessert spread.
You can serve lemon bars plain, dusted with powdered sugar, or add a light dollop of whipped cream or a few fresh berries for presentation.
For a sophisticated touch, plate them with a mint leaf and a drizzle of raspberry sauce simple yet stunning!
🧁 Helpful Tips
- Use Fresh Lemons: Fresh juice gives the bars a bright, clean flavor. Avoid bottled lemon juice.
- Zest Before Juicing: Always zest your lemons before cutting them — it’s much easier.
- Chill Before Cutting: Refrigerating ensures neat slices and enhances the flavor.
- Don’t Skip Parchment Paper: It prevents sticking and makes lifting out the bars effortless.
- Use Room-Temperature Eggs: They mix better and create a smoother filling.
- Adjust Sweetness: If you prefer extra tang, reduce the sugar in the filling slightly.
- Prevent Soggy Crust: Bake the crust until golden before adding the filling.
- Add Cornstarch (Optional): A teaspoon can help stabilize the filling for perfect slicing.
- Store Properly: Keep in an airtight container in the fridge for up to 5 days.
- Freeze for Later: Lemon bars freeze beautifully for up to 3 months — just dust after thawing.
🌟 Tips for the Best Lemon Bars
To achieve bakery-level lemon bars:
- Balance flavor: Use a ratio of ¾ cup lemon juice to 1 ½ cups sugar for the ideal tangy-sweet taste.
- Texture matters: Sift flour into the lemon mixture for a silky filling.
- Cool thoroughly: Patience is key — this step ensures perfect slicing and prevents stickiness.
- Use quality butter: Real unsalted butter enhances the crust’s flavor and flakiness.
- Finish beautifully: A fine dusting of powdered sugar right before serving gives that iconic look.
Remember — simple ingredients handled correctly make the best desserts. 🍋
⏱️ Timing Overview
| Stage | Time |
|---|---|
| Prep Time | 15 minutes |
| Cooking Time | 40 minutes |
| Cooling Time | 2 hours |
| Total Time | 2 hours 55 minutes |
🥗 Nutritional Information (per serving)
| Nutrient | Amount |
|---|---|
| Calories | 250 kcal |
| Protein | 3 g |
| Carbohydrates | 34 g |
| Fat | 11 g |
| Saturated Fat | 7 g |
| Cholesterol | 75 mg |
| Sodium | 60 mg |
| Fiber | 0.5 g |
| Sugar | 26 g |
❓ FAQs
1. Can I make lemon bars ahead of time?
Yes! Lemon bars actually taste better the next day once the flavors meld. Store covered in the fridge.
2. How do I prevent the crust from getting soggy?
Bake the crust until golden before adding the filling. Don’t pour the filling onto a raw base.
3. Can I freeze lemon bars?
Absolutely. Freeze in layers separated by parchment paper for up to 3 months.
4. How do I get clean slices?
Use a hot, clean knife and wipe between cuts for professional edges.
5. Why did my filling crack?
Overbaking or whisking too much air into the mixture can cause cracks. Bake just until set.
🌻 Conclusion
These homemade Lemon Bars are the perfect marriage of bright citrus flavor and buttery sweetness. With their velvety filling and crumbly crust, they make a timeless dessert that’s both simple and elegant.
Whether you’re serving them at brunch, gifting them to friends, or just treating yourself after a long day, these bars deliver a bite of sunshine in every square.
Once you make them, you’ll understand why this Lemon Bars Recipe is a classic that never goes out of style. 🍋💛