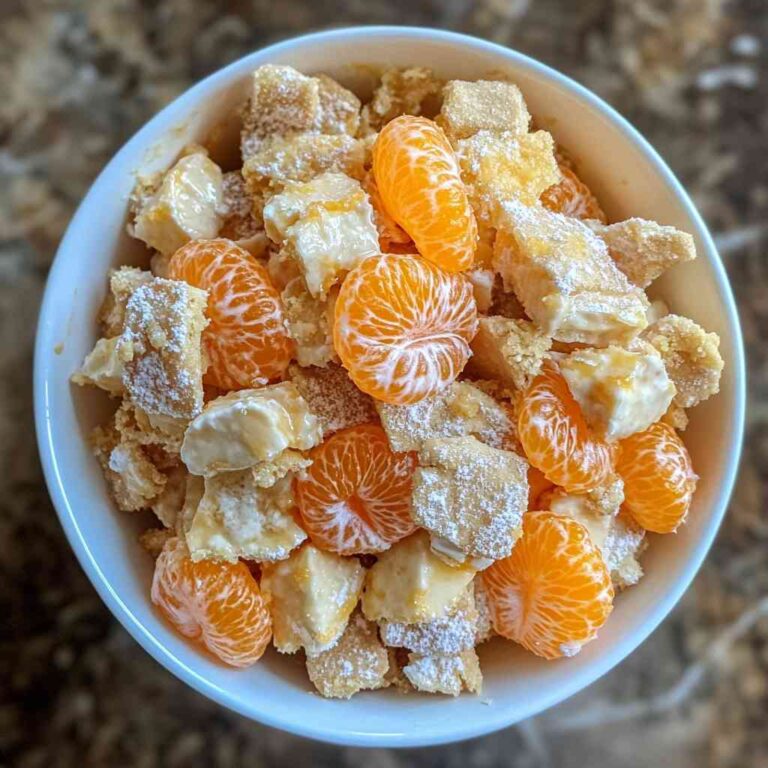
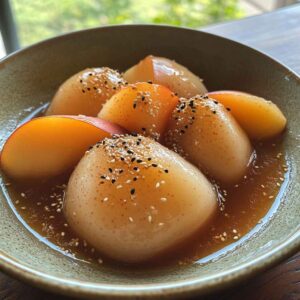
Peach mochi is a delightful fusion of delicate Japanese rice cake (mochi) texture and the juicy, fragrant sweetness of peach. Imagine a pillowy, slightly chewy outer layer that gives way to a burst of peach either fresh peach cubes, peach jam, or a creamy peach puree and you’ll understand why this treat is irresistible. Perfect for summer parties, tea time, or as a special homemade dessert, peach mochi offers a refreshing fruit-forward twist on a classic sweet.
This recipe focuses on accessibility we use mochiko (sweet rice flour) or glutinous rice flour, a simple homemade peach filling option, and clear step-by-step instructions so even first-time mochi makers can succeed.
🌟 Why You’ll Love This Recipe ?
- Fruit-forward and refreshing: Uses peaches (fresh or canned/preserved) that add natural juiciness and bright flavor.
- Soft, chewy texture: The mochiko-based dough is tender yet satisfyingly chewy — the signature mochi mouthfeel.
- Customizable filling: Use fresh diced peach, peach jam, or a peach cream for different textures and sweetness levels.
- Simple ingredients: No exotic or hard-to-find items — mochiko, sugar, water, and peaches.
- Quick-ish to make: With an active time of about 45–60 minutes you can have fresh mochi the same day.
- Great for gatherings: Bite-sized or slightly larger, peach mochi looks elegant and travels well when packed carefully.
Ingredients
2. 3/4 cup granulated sugar (adjust to taste for sweeter filling/dough)
3. 1 cup water (plus more if needed; use filtered if possible)
4. 1 tablespoon neutral oil (vegetable, canola, or light olive oil) — optional for pliability
5. Potato starch or cornstarch for dusting (about 1/3 cup)
6. 2 medium ripe peaches (about 1 cup diced) OR 3/4 cup peach jam/preserve
7. 1 teaspoon lemon juice (if using fresh peaches, to preserve color and add brightness)
8. 1–2 tablespoons powdered sugar (optional, to sweeten fresh peach filling)
9. 1/4 teaspoon salt (a pinch, balances sweetness)
10. Optional: 1/4 teaspoon vanilla extract or 1/8 teaspoon peach extract for the filling
11. Optional garnish: toasted sesame seeds, finely chopped toasted almonds, or matcha dust
Instructions
Step 2: If using peach jam or preserves, measure out 3/4 cup and warm slightly to loosen. If the jam is very sweet, you can mix it with a small spoon of water or lemon juice to balance texture and acidity. Let cool.
Step 3: Prepare your workspace and tools. Line a baking pan (8×8-inch or similar) with parchment paper and lightly dust the paper with potato starch or cornstarch. Have a bowl of water nearby to moisten your hands (prevents sticking). Keep extra starch for dusting.
Step 4: Make the mochi dough. In a microwave-safe bowl or heatproof mixing bowl, combine 1 cup mochiko, 3/4 cup sugar, and 1/4 teaspoon salt. Stir to combine. Slowly add 1 cup water and 1 tablespoon neutral oil, whisking until smooth and lump-free.
Step 5: Cook the mochi dough (microwave method). Cover the bowl loosely with plastic wrap or a microwave-safe plate. Microwave on high for 1 minute. Remove and stir quickly with a wet spatula. Microwave for another 1 minute, stir again. Microwave a final 30–60 seconds until the dough becomes glossy, slightly translucent, and thick. It should be sticky and elastic.
Step 6: (Alternative stovetop method) If you prefer stovetop: place the mochiko mixture in a nonstick saucepan over low to medium-low heat. Stir continuously with a wooden spoon or spatula to prevent scorching. The dough will thicken, become sticky, and turn slightly translucent in about 8–12 minutes. Remove from heat when the texture is glossy and elastic.
Step 7: Transfer the cooked mochi dough onto the prepared, starch-dusted parchment. Dust the top of the mochi with more starch. Using a starch-dusted rolling pin or your hands (dipped in water), gently press the dough out into an even rectangle about 1/4-inch thick. Be careful — the dough will be hot. Let cool enough to handle, about 8–12 minutes.
Step 8: Portion the mochi. Dust the top again with starch and use a sharp, starch-dusted knife or bench scraper to cut the mochi sheet into 12 equal squares (or desired size). Dust your hands and the cut pieces generously with starch to prevent sticking.
Step 9: Assemble the mochi. Take one mochi square, flatten slightly with your palm, and place about 1 teaspoon of peach filling in the center. Bring the edges together and pinch to seal, forming a smooth ball or slightly flattened disc. Repeat with remaining pieces. Dust off excess starch with a pastry brush or gently tap each mochi on a clean surface.
Step 10: Finish and chill. Place finished mochi on a tray lined with parchment. Optionally, sprinkle lightly with toasted sesame seeds or matcha dust for color and flavor. Chill in the refrigerator 20–30 minutes to set slightly before serving, or serve at room temperature.
Step 11: Storage. Store assembled mochi in an airtight container at room temperature for up to 1 day (best eaten fresh) or in the refrigerator for up to 3 days. If refrigerated, allow mochi to come to room temperature for 15–20 minutes before serving to soften. For longer storage, freeze individually on a tray until solid, then transfer to a freezer bag for up to 1 month. Thaw in the fridge overnight and bring to room temperature before eating.
🍑 Variations
Peach mochi is wonderfully adaptable. For a fresher bite, fold tiny diced fresh peaches into a lightly sweetened whipped cream and pipe that into the mochi for a creamier, layered texture (peach cream mochi). If you prefer a smoother center, use strained peach purée or warmed peach jam for a jammy, consistent filling.
For a cream-cheese twist, mix softened cream cheese (about 2–3 tablespoons) with 2 tablespoons peach jam for a tangy-sweet center that pairs beautifully with the rice dough. Want something decadent? Add a small cube of white chocolate or a thin hazelnut praline inside each mochi for a surprise texture.
To make vegan-friendly mochi fillings, use coconut cream and peach purée mixed with a touch of maple syrup. For a summer picnic, wrap mochi around chilled peach sorbet balls for an ultra-refreshing treat — assemble quickly and keep cold. You can also infuse the dough with subtle flavor: add 1/4 teaspoon peach extract or a pinch of ground ginger for a warm contrast, or replace part of the water with brewed chamomile tea for a floral note.
🍳 Cooking Note
Mochi dough demands attention to texture: undercooked, it will be pasty; overcooked, it can become too stiff. Whether you use microwave or stovetop, look for a glossy, slightly translucent, sticky mass that pulls and stretches. Work on a starch-dusted surface and keep hands slightly damp to prevent tearing and sticking; the starch forms a barrier and gives a soft exterior powder finish.
If the dough cools and becomes hard to stretch, warm it gently for a few seconds in the microwave (covered) or steam briefly to regain pliability. When using fresh peaches, remove excess juices beforehand: highly juicy peaches can make the filling too wet and cause the mochi to become soggy. Cook fresh peach filling down to a jammy consistency, or drain diced peaches on paper towels.
The dough will be very sticky right after cooking resist the urge to add excess starch into the dough itself (overstarching makes mochi dry). Instead, use starch on work surfaces and hands. Finally, mochi is best eaten within a couple of days; refrigeration helps but causes slight firming bring to room temperature before serving for the best chewy texture.
🍽️ Serving Suggestions
Serve peach mochi as a delicate dessert at the end of a dinner, paired with green tea, oolong, or lightly brewed jasmine tea to complement the peach’s floral notes. Arrange mochi on a small plate dusted with matcha powder for contrast and an elegant presentation. For a more indulgent pairing, serve with a scoop of vanilla or yuzu ice cream and a drizzle of honey or peach syrup.
For party platters, alternate peach mochi with other flavored mochi (matcha, red bean, mango) and include small wooden picks or decorative toothpicks. Tiny edible flowers or thin peach slices as a garnish add color. If serving outdoors, keep mochi chilled in a covered tray with ice packs underneath the plate to maintain texture and prevent melting of chilled fillings like cream or sorbet.
💡 Helpful Tips
- Choose the right peaches: Ripe but firm peaches are ideal — they have flavor without excess juice. If peaches are too soft, the filling will weep. <br>
- Control moisture: For fresh peach filling, simmer until jam-like. For diced peach fillings, pat dry on paper towels. <br>
- Use mochiko (sweet rice flour): Don’t substitute regular rice flour — it lacks the elasticity needed for true mochi texture. <br>
- Starch is your friend: Dust generously on surfaces and hands to prevent sticking; potato starch or cornstarch both work. <br>
- Work warm: Mochi is easier to shape when warm but not burning. Let it cool a few minutes after cooking. <br>
- Seal tightly: When wrapping filling, pinch firmly to avoid leaks, and smooth seams with a wet finger. <br>
- Avoid over-sweetening: Peach fillings are naturally sweet; taste before adding extra sugar. <br>
- Batch prep: Make filling ahead and keep chilled. Cook mochi dough just before assembly for best texture. <br>
- Freezing tip: Freeze mochi individually on a tray before bagging to prevent sticking. Thaw slowly in the refrigerator.
🔧 Tips for the Best Peach Mochi
- Use high-quality mochiko labeled “sweet rice flour” for the proper chew.
- Pick peaches that are aromatic with a slight firmness; overly ripe fruit causes watery fillings.
- Keep the work area well-dusted with starch but avoid mixing starch into the cooked dough. Excess starch dries the mochi.
- If using microwave, stir between cycles — even heating prevents hot pockets and uneven cook.
- Handle mochi with slightly wet hands to reduce tearing and help smooth seams.
- For a visually pleasing result, roll finished mochi briefly in fine powdered sugar (optional) to remove excess starch and leave a clean finish.
- Serve at room temperature for the true soft, chewy experience.
⏱️ Timing Overview
- Prep Time: 15 minutes (includes preparing peaches and starching workspace)
- Cook Time: 15 minutes (depends on microwave vs stovetop and filling jam-making)
- Assembly Time: 15–20 minutes
- Total Time: 45 minutes
🧾 Nutritional Information (per medium mochi, estimate)
Note: These are approximate values — actual nutrition depends on peach size, amount of sugar used, and exact portion size.
- Calories: 150 kcal per mochi (if using jam filling toward upper end)
- Protein: 2 g
- Fat: 2 g (from optional oil or cream fillings)
- Carbohydrates: 35 g (mostly from mochiko and sugar)
- Fiber: 1 g (from peach)
- Sodium: 60 mg (small pinch salt in dough)
- Sugars: 20 g (depends on filling choice)
If you require a detailed calorie breakdown for a specific filling (fresh diced peach vs jam vs cream cheese-peach), I can calculate a more precise nutrition panel from exact ingredient weights.
❓ FAQs
Q1: What is mochiko?
A: Mochiko is sweet rice flour (glutinous rice flour) made from short-grain glutinous rice. It creates the characteristic chewy texture in mochi. It is NOT the same as regular rice flour.
Q2: Can I make this mochi gluten-free?
A: Yes. Mochiko (glutinous rice flour) is naturally gluten-free. Ensure any added flavorings or fillings (like certain jams) are gluten-free.
Q3: Can I use canned peaches?
A: Yes — drain well and pat dry if using diced canned peaches. Canned peach preserves (jam) make an easy, stable filling.
Q4: How do I prevent mochi from sticking to everything?
A: Use plenty of potato starch or cornstarch on work surfaces, on your hands, and on the mochi pieces. Keep a bowl of water to wet your fingers when sealing.
Q5: How long will mochi last?
A: Best eaten the same day. Stored in an airtight container in the fridge it keeps 2–3 days but firms up — bring to room temperature to restore chew. For longer storage, freeze individually.
Q6: Is mochi safe for children and older adults?
A: Mochi is sticky and chewy — take care with young children and elderly to avoid choking. Cut into small pieces and supervise young children when eating.
Q7: Can I color the mochi dough?
A: Yes — add a drop of natural food coloring or powdered fruit/vegetable powders (freeze-dried peach powder, beet for pink) into the water before cooking for tinted dough.
Q8: Can I make mochi ahead?
A: You can prepare the filling a day in advance and assemble mochi just before serving for the best texture.
✅ Conclusion
This Peach Mochi Recipe gives you a delightful, fruit-filled take on classic mochi — chewy, slightly sweet rice dough enclosing a vibrant peach center. It’s approachable for home cooks and highly adaptable: use fresh peaches, preserves, or a cream-cheese-peach hybrid depending on your taste.
The key to success is paying attention to moisture control in the filling, proper starching to prevent sticking, and achieving a glossy, elastic dough texture whether you cook via microwave or stovetop.
Serve chilled or at room temperature with tea or ice cream, and you’ll have a dessert that’s both elegant and comforting.
Delicious Peach Mochi Recipe
⏱️ Timing Overview
🥘 Ingredients
📝 Instructions
- Prepare the peach filling. If using fresh peaches: peel (optional), pit, and dice the peaches into small pieces. In a small saucepan, combine diced peaches, 1 tablespoon sugar (or to taste), and 1 teaspoon lemon juice. Cook over medium-low heat, stirring frequently, until the peaches break down and become jammy — about 8–12 minutes. For a smoother filling, mash with a fork or pulse briefly in a blender. Let cool completely.
- If using peach jam or preserves, measure out 3/4 cup and warm slightly to loosen. If the jam is very sweet, you can mix it with a small spoon of water or lemon juice to balance texture and acidity. Let cool.
- Prepare your workspace and tools. Line a baking pan (8x8-inch or similar) with parchment paper and lightly dust the paper with potato starch or cornstarch. Have a bowl of water nearby to moisten your hands (prevents sticking). Keep extra starch for dusting.
- Make the mochi dough. In a microwave-safe bowl or heatproof mixing bowl, combine 1 cup mochiko, 3/4 cup sugar, and 1/4 teaspoon salt. Stir to combine. Slowly add 1 cup water and 1 tablespoon neutral oil, whisking until smooth and lump-free.
- Cook the mochi dough (microwave method). Cover the bowl loosely with plastic wrap or a microwave-safe plate. Microwave on high for 1 minute. Remove and stir quickly with a wet spatula. Microwave for another 1 minute, stir again. Microwave a final 30–60 seconds until the dough becomes glossy, slightly translucent, and thick. It should be sticky and elastic.
- (Alternative stovetop method) If you prefer stovetop: place the mochiko mixture in a nonstick saucepan over low to medium-low heat. Stir continuously with a wooden spoon or spatula to prevent scorching. The dough will thicken, become sticky, and turn slightly translucent in about 8–12 minutes. Remove from heat when the texture is glossy and elastic.
- Transfer the cooked mochi dough onto the prepared, starch-dusted parchment. Dust the top of the mochi with more starch. Using a starch-dusted rolling pin or your hands (dipped in water), gently press the dough out into an even rectangle about 1/4-inch thick. Be careful — the dough will be hot. Let cool enough to handle, about 8–12 minutes.
- Portion the mochi. Dust the top again with starch and use a sharp, starch-dusted knife or bench scraper to cut the mochi sheet into 12 equal squares (or desired size). Dust your hands and the cut pieces generously with starch to prevent sticking.
- Assemble the mochi. Take one mochi square, flatten slightly with your palm, and place about 1 teaspoon of peach filling in the center. Bring the edges together and pinch to seal, forming a smooth ball or slightly flattened disc. Repeat with remaining pieces. Dust off excess starch with a pastry brush or gently tap each mochi on a clean surface.
- Finish and chill. Place finished mochi on a tray lined with parchment. Optionally, sprinkle lightly with toasted sesame seeds or matcha dust for color and flavor. Chill in the refrigerator 20–30 minutes to set slightly before serving, or serve at room temperature.
- Storage. Store assembled mochi in an airtight container at room temperature for up to 1 day (best eaten fresh) or in the refrigerator for up to 3 days. If refrigerated, allow mochi to come to room temperature for 15–20 minutes before serving to soften. For longer storage, freeze individually on a tray until solid, then transfer to a freezer bag for up to 1 month. Thaw in the fridge overnight and bring to room temperature before eating.